

AirDrop is a quick and straightforward method for Apple devices to transfer photos, documents, and other items. But before you can use it, you must activate it.
AirDrop is often the fastest method for transferring data between an iPhone, iPad, iPod touch, and a Mac. In addition to photographs and documents, users may also share website URLs, passes from Wallet, Apple Maps locations, and almost anything else that can be shared using the Share sheet.
Here’s how to activate AirDrop on your Mac, iPhone, iPad, or iPod Touch using Wi-Fi and Bluetooth.
Table of Contents
How does an AirDrop function?
Bluetooth is used by AirDrop to build a WiFi network along with Apple devices. According to Apple, for utilizing AirDrop, the Apple gadgets must be within the Bluetooth range, around 30 feet. Additionally, both devices must have Bluetooth, Airdrop, and WiFi turned on.
How to turn on Airdrop
To turn AirDrop on an iOS or iPadOS device, access iOS Control Center open by dragging the finger from the bottom of the screen on earlier models or dragging it down on iPhone X and later. Then, press the WiFi button, click AirDrop, then select the individuals who may transmit documents from and to an iPhone. It will get the airdrop enabled.
Launch the macOS Control Center of the iOS device. On an iPhone X or later, you may accomplish this by dragging a finger down from the top right corner of the display. On older iOS models, you may access the Control Center after sliding your finger upwards from the screen.
Then press and maintain the Wi-Fi button. The Wi-Fi and Bluetooth signal will appear as ‘three curved lines in a circle on the control center’s display.
Note: This page lets you determine if your Wi-Fi is switched on. Otherwise, you may activate them both by touching their respective symbols.
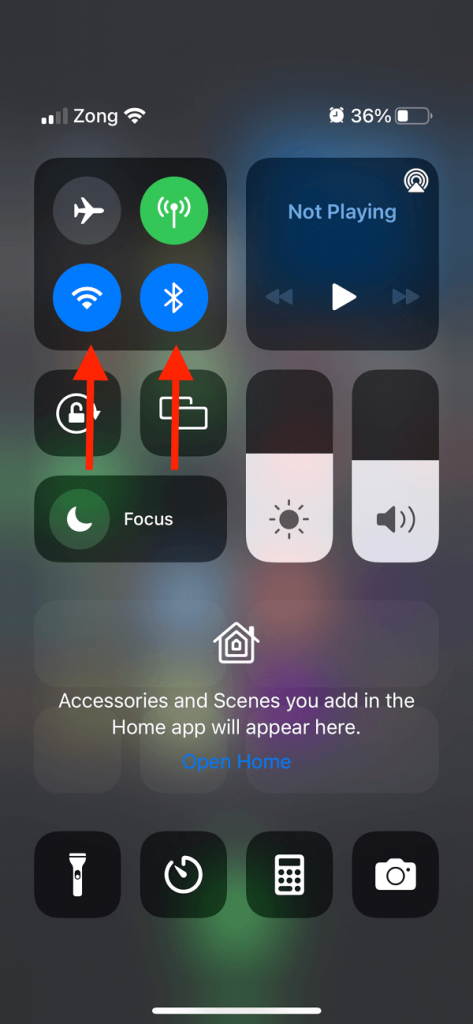
Next, Enable AirDrop.
Choose who is permitted to transmit documents on another phone. Once you choose only your Contacts, only your contacts will have permission to send you documents. But once you select Everyone, all Apple gadgets within range can send documents to you. AirDrop may be disabled at any moment by choosing ‘Receiving’ to be switched Off.
Please remember that if one can’t turn Receiving Off, go to Airdrop Setting, enter the Screen Time and select the Content and Privacy Restrictions. Afterward, choose Allowed applications and enable the AirDrop slider. It is activated if the indicator is turned green.
How to turn on airdrop Between a Mac and an iPhone
Open a Finder window and choose a file or folder to utilize AirDrop to transfer files from a Mac to another Mac or an iPhone. Then, pick AirDrop by clicking the Share button in the Finder window. Finally, choose the device to which you want to transfer files.
Select the file you want to AirDrop from your Mac.
Tap the Share symbol in the Finder window. This is the symbol consisting of an arrow going upwards from a box. If this option is greyed out, pick the file you want to AirDrop.
Next, tap AirDrop.
Double-click the iPhone recipient from the list to conclude. When you share a picture or video, it will be transmitted to the iPhone’s Photos app.
Alternately, you may email files from a Mac by following the instructions below:
Launch the Finder window.
Then pick AirDrop from the sidebar on the left. If you do not see this in the left sidebar, pick Finder and simultaneously press the Command and comma keys. Then, choose the Sidebar tab and tick the AirDrop box.
Finally, drag a file onto the recipient’s profile picture to transmit it.
How to turn on airdrop on a Macintosh
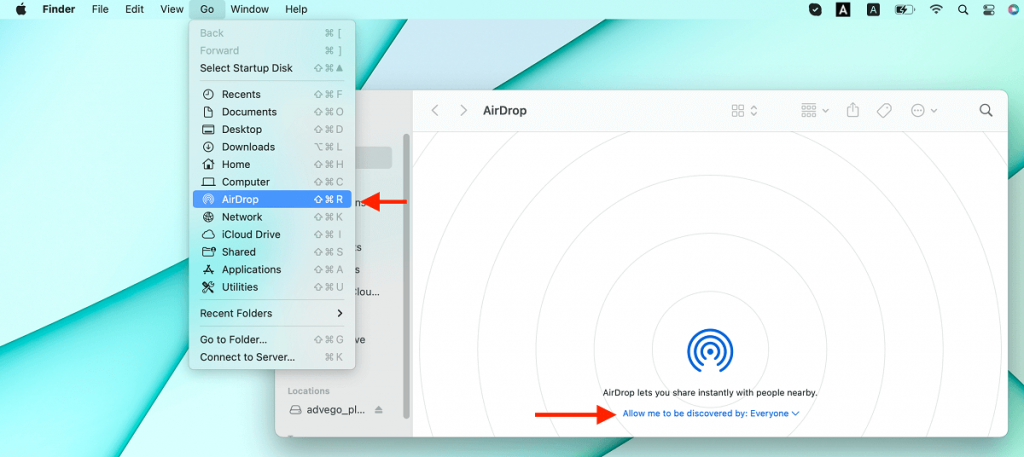
To activate AirDrop on a Mac, right-click on the desktop control center. Next, select AirDrop from the options after clicking Go at the top of the screen. Finally, click Allow me to be found on the last option of a new popped menu and decide who can send documents to your device.
Remember: To utilize AirDrop, a MacBook must have WiFi enabled and Bluetooth turned on. To do this, choose System Preferences by clicking the Apple symbol in your screen’s upper-left corner. Next, select Bluetooth and turn Bluetooth On, followed by tapping on Network, tap Wi-Fi, and lastly, choose the Turn Wi-Fi On option.
Right-click on the desktop of your Mac. In addition, you may launch a Finder tool.
Afterward, from Apple Menu Bar, click Go. This will appear at the start of the display screen.
Adjust AirDrop settings next. You may skip the preceding step by pressing the Command key plus the Shift and the R keys.
Tap on Allow others to find me. This is shown at the end of a pop-up window.
Choose who is permitted to transmit documents to you. For example, if one chooses Contacts Only, one might receive files from only the contacts in the address book. But if ‘Everyone’ is selected, any Apple device within range may use AirDrop to transmit documents to your Mac. AirDrop may be disabled at any moment by choosing ‘Receiving Off’.
Use AirDrop Between an iPhone and a Mac
Please open the file you want to share on your iPhone to utilize AirDrop to send it to another iPhone or Mac. Then pick AirDrop from the Share menu. Next, click on the device’s name to which you wish to deliver the file.
Launch the documents that you wish to AirDrop to your iPhone. For sharing a photo, you may use the Photos or Camera app.
Click on the ‘Share’ button then. It will look like a box having an upward-pointing arrow. Depending on what you’re attempting to share, you’ll find this symbol in various locations on the screen. You may also locate it by touching and pressing the photos, text, and other content.
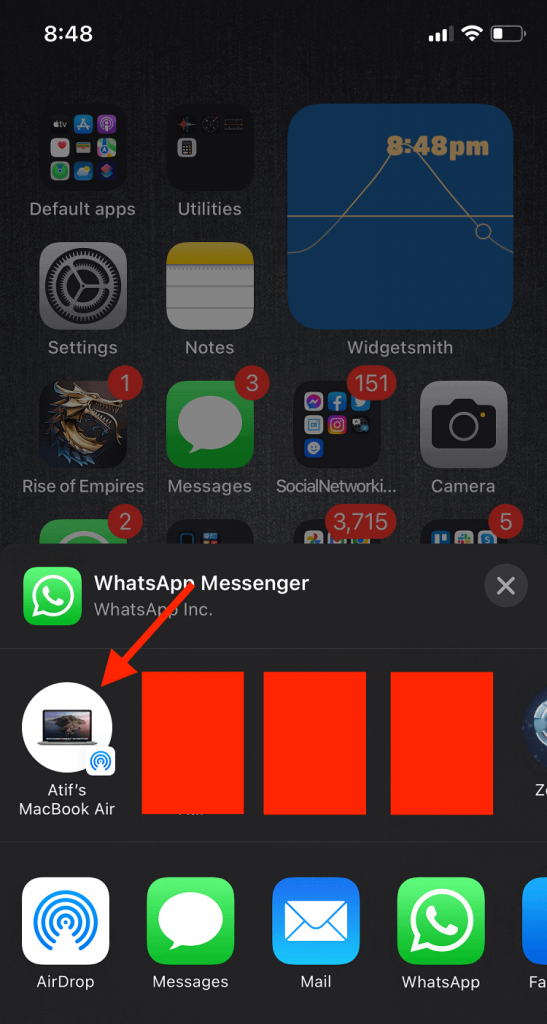
Tap the AirDrop button next. This will appear in a queue alongside other applications.
Tap on the desired device to which you wish to transmit the files. If the receiver is saved in the contacts list, the information and picture will appear along with the device’s symbol. Alternatively, a grey oval with the owner’s initials will be shown.
The documents will quickly be transferred to a Mac and shown in the ‘Downloads’ folder.
Depending on the recipient, they may be required to accept the AirDropped message after pressing and/or tapping the ‘Accept button’ on the message displayed on their Mac or iPhone.
How to use AirDrop
When someone shares anything with you through AirDrop personal hotspot, you get a notification that includes a preview. Then, you may press Accept or Decline.
If you press Accept on nearby apple devices, AirDrop will be received in the same app from where it was sent. For instance, images are shown in the Photos app, while webpages open in Safari. In addition, links to apps open on the App Store, allowing you to download or buy the app.
If you AirDrop anything to yourself, such as a picture from your iPhone to your Mac, you will not be given a choice to Accept or Decline the item; the file will quickly be transferred to your device. Just ensure that both devices have the same Apple ID signed in.
Conclusion
It is now simpler than ever to transmit files and photographs across devices. With Apple devices, you can use AirDrop to share files – even those too large for email – between an iPhone, Mac, and iPad with a single touch, provided they are within range.