
With iPhone 14’s arrival, are you ready to update your phone?
We bet you’re. But if you’re contemplating the purchase because you don’t know how to transfer eSim to the new device from the previous iPhone, don’t sweat. We got you covered.
Most religious iPhone users update their devices yearly or every two years. So if you thought switching from a physical sim to an eSim is a good idea, wait until you have to switch phones.
So, here we have accumulated all possible solutions to transfer eSim from an old iPhone to your latest pick. Continue reading to find out.
Table of Contents
Everything You Need to Know About eSim Transfers
It’s been quite a few years since Apple has supported eSim technology.
In 2018, Apple launched its first iPhone that supported eSim, i.e., iPhone XS. Since then, every latest model in the Apple lineup has supported eSim.
All of these models also possess a small slot for a Nano-Sim card. So, in case you weren’t very thrilled about installing an eSim. You didn’t have to!
You could always use the physical sim instead of the embedded sim. It is also a cellular plan, just like the physical sim.
The only difference is that these sims can be programmed electronically. So, you won’t have to insert a physical sim card into your phone.
Instead, you scan a QR code in your iPhone containing relevant carrier information. Your network provider will acknowledge the activity by creating a network connection.
Once you have initiated the process, your iPhone will respond to your cellular network just like it would with a physical sim.
You can run both cellular plans on your iPhone, i.e., an eSim or physical sim.
Requirements to Fulfill to Activate eSims
Here is what you must do to transfer your eSim from a previous iPhone to a new iPhone.
- It would be best to have an iPhone XS, iPhone XS Max, iPhone XR, or any of the latest models after these.
- eSim from wireless carriers that will allow transferring eSims.
- You should connect your new iPhone to a Wi-Fi network for eSim activation. Although, iPhone 14 doesn’t need Wi-Fi for eSim activation. The new feature can activate an eSim without an internet connection.
Note that iPhones in China do not offer eSim. However, in Hong Kong and Macau, some iPhones may have the feature to install eSim.
Different Ways to Transfer your eSim to a New iPhone
Transferring eSim from an old iPhone to a new iPhone takes time and requires you to be at par with upgraded knowledge.
So, in this article, we will discuss a few ways to help you transfer your eSim cellular plan to a new iPhone.
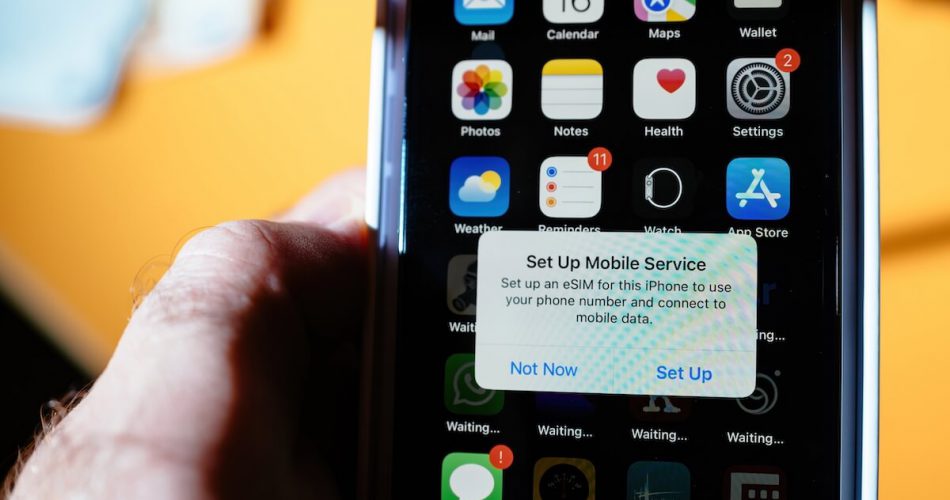
Transfer eSim Cellular Plan to New iPhone During Setup
During the initial setup on your iPhone, the new device will ask if you’d like to transfer your cellular plan via eSim.
Unfortunately, not all carriers support transferring, so you must get your eSim from a carrier that does if you plan to change your iPhone.
Follow these steps if you’d like to transfer eSim from the previous phone to the latest.
- Tap on the number you want to transfer from your old iPhone to the new iPhone.
- Tap Continue
- Follow the on-screen instruction to transfer your cellular plan.
- Remove your cellular network plan from your previous iPhone. But before that, call on your new iPhone to ensure cellular connectivity.
Once you have activated your cellular plan on your new iPhone, Apple will automatically delete the network plan from your previous iPhone.
Setup eSim on the New iPhone using Quick eSim Transfer
Previously, you would have to visit your service provider’s office when you wanted to convert your physical sim to a new eSim.
But with iOS 16, your iPhone can automatically convert the physical sim into an embedded one even if you have never used an eSim before.
This method will be discussed later. But first, let’s discuss using Quick Transfer to set up eSim on your new iPhone.
During the initial setup, the iPhone will ask you if you want to transfer your cellular plan from your current iPhone to the latest one.
The process will also determine if you’re already using an eSim cellular plan and whether you’d like to transfer it to the new iPhone.
Here is what you need to do,
- Both your devices should be updated to iOS 16 or later.
- Next, choose a cellular plan you’d like to transfer from the list of numbers. If you don’t see any list, tap Transfer from Another Device.
- Follow the instructions on your previous iPhone to initiate a transfer. It may ask you to enter a verification code on your new iPhone. Enter the code and tap Transfer.
- Wait for a few seconds until the iPhone activates your cellular plan. Then, as mentioned earlier, Apple will automatically delete the physical or eSim plan from your previous iPhone.
- Tap Finish Setting Up Your Carrier’s Cellular Plan. It will redirect you to your carrier’s webpage to transfer eSim.
- You can also download your carrier’s iPhone app to complete the transfer process later.
If this doesn’t work, you should contact your carrier support team. They will be able to fix the issue.
Transfer eSim from Previous iPhone Via Settings
Did you forget to transfer your eSim to your new iPhone during the initial setup? Don’t worry; it isn’t the end of the world. You can still transfer your eSim by going to the settings app.
Follow these instructions
- Go to Settings on your new iPhone. Tap Cellular and then tap Add Cellular Plan.
- If your eSim plan is listed on the screen, tap the Add Cellular Plan button at the bottom.
- Check if a prompt asks if you want to transfer your cellular plan to your old device.
- Tap Transfer.
This should initiate a transfer between both of your devices. Once the new iPhone registers the eSim, the cellular plan will be deleted from your previous iPhone.
Transfer an eSim Via Bluetooth on iOS 16
With the launch of iPhone 14, IOS 16 has given us several new features that make setting up an eSim feel like a walk in the park.
For example, a unique feature Apple users can enjoy now is to transfer an eSim via Bluetooth.
Here is what you have to do.
- Go to your Settings and tap on Setup an eSim to bring up options for transferring eSim and its associated number via Bluetooth.
- Make sure the other iPhone is nearby and has Bluetooth turned on. It should also have running iOS 16 for this process to work.
- Follow the instructions on the screen, and you can transfer your eSim to the new iPhone.
If this doesn’t work, you can contact your carrier service provider and get help from their customer service representative.
So, these are all the methods you can use to transfer your eSim from an old iPhone to a new iPhone. We also have some additional information in this regard that you will find below.
Other Methods to Setup eSim
Convert Physical Sim to eSim
If you don’t want to visit your service provider and convert your physical sim card to eSim, you don’t have to.
Apple is already on it. In the latest iOS 16, you can automatically convert your physical sim to eSim.
Follow these instructions.
- Go to Settings, then tap Cellular.
- Tap Convert to eSim. You need to contact your carrier if you don’t find this option.
- Tap Convert Cellular Plan.
- Choose the phone number you want to convert and tap Convert to eSim.
Wait for your cellular plan to activate on your new iPhone. Once the transfer process completes, your old sim card will be rendered useless. Reboot your iPhone after removing the sim card.
Setup New eSim Using QR Code
Some carriers don’t support quick embedded sim transfer.
So you will need a QR code to transfer your phone number and cellular plan from your previous iPhone to the new model. For this, you need to go to settings and tap Cellular.
There will be an option to set up eSim via a QR code.
Once you select the option, it will take you to your camera, and you can follow the on-screen instructions to scan the QR code and set up eSim on your new iPhone.
The process of how this QR code works varies from carrier to carrier. If your QR code doesn’t work, you must call the support team to get them to resolve your issue.
Final Verdict
Transferring eSim from one iPhone to another with an iPhone XS Max or iPhone XR isn’t that difficult if you use the same Apple ID on both iPhones.
This is because your Apple ID has all the relevant data your device needs to register whose phone is.
The QR codes your carrier gave you keep safe because they will be used to set up your embedded sim on a new iPhone if none of the above-mentioned methods work. You must contact your support team if the QR code doesn’t work.
You can also add these plans to your Apple Watch and choose which network your watch should use when connected to a cellular network.
Don’t forget to use lock screen widgets for a quick setup.
Hopefully, this article was worth your time and attention. So do leave us with your feedback. Thank You.