

Transferring files from one device to another is pretty easy these days. With Apple, sharing becomes even more convenient and seamless.
All iOS devices can Airdrop files; this means you can transfer files such as photos, videos, map locations, websites, and more wirelessly through all your Apple devices and other iOS device users.
The fantastic “Share” feature saves you time. Moreover, useful when you need to transfer or share large media files such as music or videos from your iPhone or iPad.
However, Airdrop is not limited to iOS device users only. You can instantly Airdrop files to your iPhone in your device’s settings are configured accurately.
Here’s a step-by-step guide for using Airdrop, as well as some suggestions for resolving your issues:
Table of Contents
What Do I Need to Transfer Files Using AirDrop?
If you own a Mac, it must be running on at least Mac OS X Lion. However, it works best on Yosemite and iOS 8 and above.
In addition, if your Mac runs on Yosemite or later versions, you’ll be able to share with Apple devices.
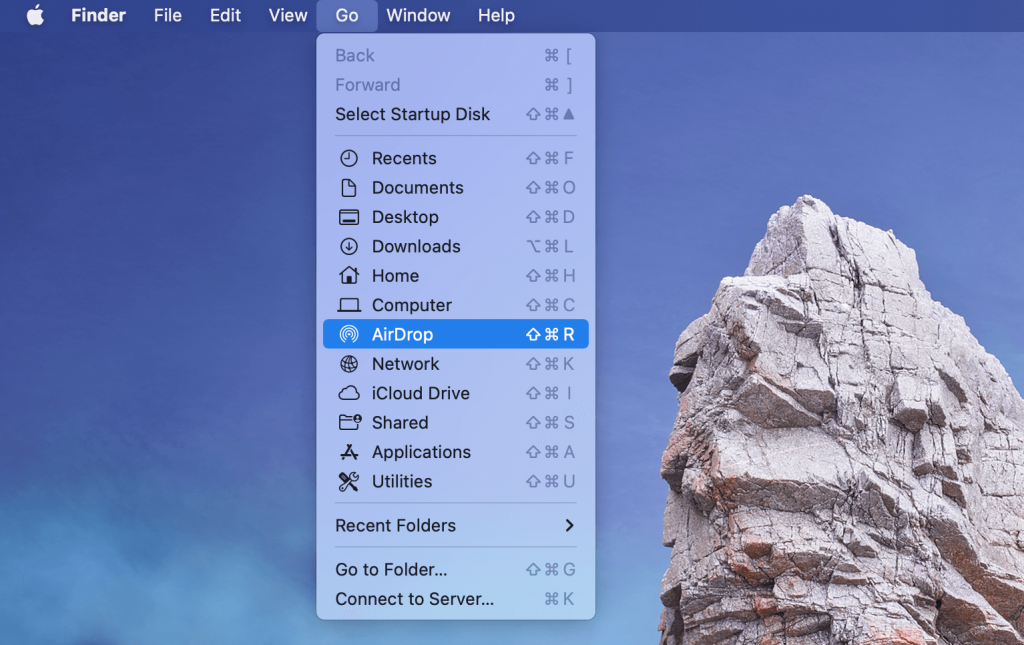
You can check if your Mac can use Airdrop by clicking on the Finder icon from your menu bar. Then choose the Go menu. If you find Airdrop as a listed option, you’re all set to use it.
How to AirDrop From My iOS Device to Mac?
AirDrop from an iPhone to a Mac is excellent for many photographers to use their iPhones to capture images but prefer to edit them on a larger screen.
Not only that, but it’s also a terrific way to share all of your amazing iPhone photos and videos with friends and family. In addition, AirDrop can be an excellent way to transfer pictures, movies, and music from your iPhone to your Mac if you do not use the same iCloud account to sync your stuff automatically.
Here’s how you can use AirDrop to transfer photos from your iPhone to your Mac wirelessly.
Step 1: Turn on AirDrop on Your Apple devices
To start using Airdrop to share photos from iPhone to Mac, you need to enable the Airdrop feature on your iOS device (On your Iphone). Follow these steps to do so.
- Go to the Settings tab.
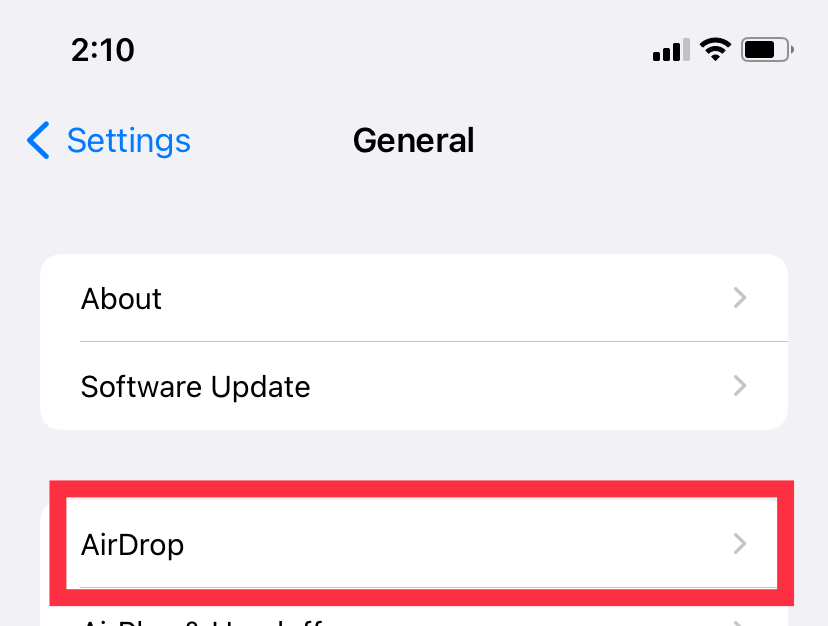
- Scroll to the bottom of the page and select General.
- Choose the AirDrop icon from the menu.
- Choose Contacts Only from the AirDrop menu to send files to people present in the contacts app or Everyone.
- To transfer files, make sure you turn on Bluetooth and your Wi-Fi.
What If You Have an iPhone With an Old Software Version?
It is important to note that if AirDrop is set to Contacts Only on a device with an older software version, you can change it to Everyone.
You can do so while using AirDrop, then back to Contacts Only when not in use. Select Security & Privacy from the Apple menu > System Preferences. Click the Firewall tab, then select the lock, and when requested, enter your administrator password. Deselect “Block all incoming connections” under Firewall Options.
Step 2: Enable AirDrop for Your Mac
You must enable Airdrop for your Mac to receive files from the iOS device. Follow these steps:
- Launch the Finder app.
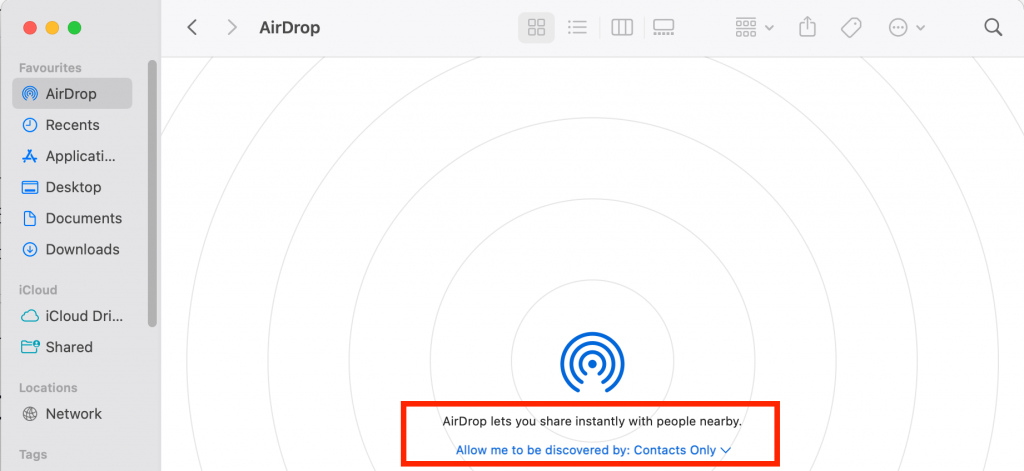
- From your left sidebar, choose AirDrop. An AirDrop window may now appear on the screen.
- Next, you will come across “Allow me to be discovered by,”
- Now, choose Contacts Only or Everyone.
- To start transferring files, you must have Wi-Fi and Bluetooth turned on. Moreover. Ensure that you are not far from that.
Step 3: AirDrop Photos to Mac from iPhone
Now that you’ve enabled AirDrop on Mac and iPhone, it’s time to start transferring files. Here’s how you’ll do it:
- First, launch a file you wish to send using AirDrop.
- To AirDrop, numerous videos or photos, open the Photographs app and press Select to select all of the videos and images you plan to send.
- In the lower-left corner, select the share icon.
- Select AirDrop.
- From the dropdown options, choose Apple device. The icon may be encircled, showing the term Waiting. Next, you will see Sending and finally Sent.
- Tap Done once your photographs have been received.
It’s worth mentioning that your iPhone images may be shared to Mac in the form of HEIC files, which aren’t compatible with all Mac software. To learn how to avoid and overcome this problem, check a HEIC format guide.
How Many AirDrop Photos Can You AirDrop?
There is no theoretical limit to the number of photos you could transfer via AirDrop. However, the size of your data and the CPU power for your devices will determine the success of your file transfer.
The process can take approximately a minimum of 20 minutes or more. In addition, you can not use any of the devices during the process.
Can You AirDrop Your Complete Camera Roll?
Although you can share unlimited files through AirDrop, the larger your data size may be, the longer the time will be taken to complete the process.
Here is how you can AirDrop your complete Camera Roll on an iPhone or iPad to Mac:
- Launch the Photos app.
- To ensure you include all of the photographs in your Camera Roll, go to Library, then All Photos.
- Choose Select.
- Choose the first image from the row at the bottom.
- Hold down the thumbnail image with two fingers. Then carefully slide your fingers upwards, selecting all photographs in Camera Roll.
- This process takes a level of precision. However, it is still significantly less time-consuming than choosing each image individually.
- After you’ve selected all photographs, select the Share button.
- Tap AirDrop.
- Then select any device you may want to send the photos.
- Keep in mind that your transfer might take some time.
- Tap Done once all files have been transferred.
What to Do When Mac Does Not Show on Airdrop?
There is always room for error when dealing with technology if your Mac does not show on Airdrop.
Here are potential reasons with solutions to your problem.
Mac isn’t Set as Discoverable
You must make sure Mac is discoverable by other people.
Your Mac or iPhone has Wi-Fi or Bluetooth Turned On
AirDrop uses Bluetooth technology to locate nearby devices before transferring data over Wi-Fi. On Mac, click on the Bluetooth logo present at the top of your screen to ensure both are turned on. Next, turn on Bluetooth by clicking the button. Now select any Wi-Fi connection you wish to join by clicking on the Wi-Fi logo on your screen. Finally, check your iPhone’s Control Panel to see if both options are turned on.
Mac Is on Sleep Mode
For AirDrop to work, the Mac display should be turned on. Try pressing any key to make your computer stay awake.
How to AirDrop From Mac to iPhone
Now that you know how to Airdrop from iPhone to Mac, let’s move to Airdrop from Mac to iPhone.
To learn how you can Airdrop from Mac to iPhone, follow these steps:
- Make sure your iOS device and Mac have Bluetooth and Wi-Fi turned on. Next, open the Finder window on Mac and open your folder where all videos and photos are stored.
- Then, control-click any video or image. To transfer several photos or videos using AirDrop, press and hold the Command button. In addition, you must keep clicking each video or photo to highlight them.
- Select AirDrop from the sharing menu in the sidebar of a Finder window.
- Then, select a designated device for sharing your files.
- Click Done.
- Now, your media may appear in your iPhone’s Photos app.
How to Save Received Airdrop Files?
Your iPhone, iPad, or iPod touch can also be used to share content. In addition, airDrop allows you to receive content. When someone nearby tries to send you files through AirDrop, you’ll receive their request as a notification or a message AirDrop window. To save the files to your Downloads folder, click Accept.
What to Do If Mac Airdrop Is Not Working?
If Airdrop is not responding or working on Mac, there is nothing to worry about; however, here are a few reasons for errors and their solutions.
Your Mac Is on Airplane Mode
Airplane mode may disable your device’s cellular radio, including Wi-Fi. So, if AirDrop isn’t working, try to turn off the Airplane mode.
You May Have Used Personal Hotspot as Mac’s Wi-Fi
AirDrop will be deactivated if Mac connects to your phone’s Hotspot. This is because AirDrop and your Hotspot need Wi-Fi. To disable this feature on iOS, go to Settings, then Personal Hotspot to turn it off.
Bluetooth Connection Isn’t Working Properly
Unexpected issues arise occasionally. For example, turn your Mac’s Bluetooth off. Once done, turn it on again if everything else fails.
Final Thoughts
So now you know how to get the best of the Airdrop feature both on Mac and iOS devices. Whether you have a MacBook Pro, MacBook Air, or any other Mac, you can enjoy transferring files quickly. Airdrop from Mac to iPhone, and you’re good to go.
You must keep in mind that both devices must be linked to Wi-Fi and Bluetooth. In addition, your iOS device and Mac must be within 30 feet range of one another. This way, you can send and receive y0ur files whenever you want.