
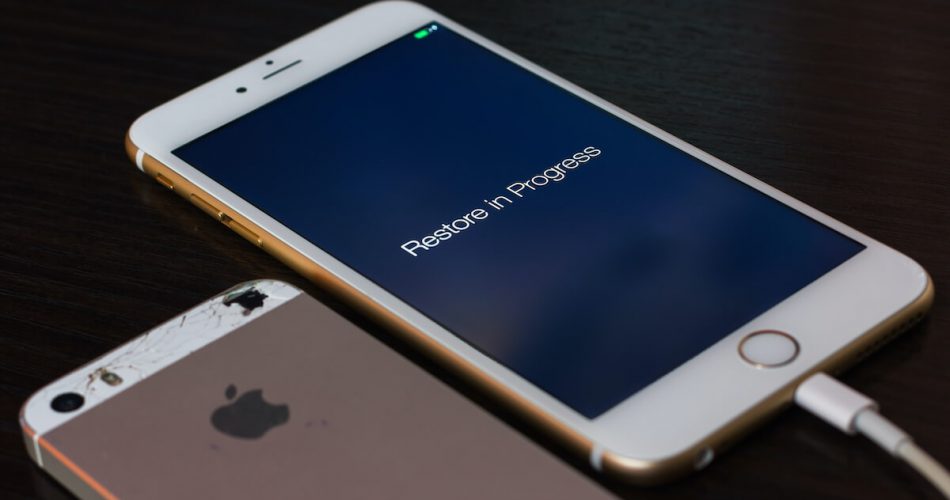
Sometimes problems in complicated situations are pretty simple. The same is the case with restoring iPhones without updating the iOS device. Many people restore iPhones to fix minor issues related to the device when they lock the iPhone by mistake or by attempting too many wrong passwords.
Restoring iPhone can lead to its software update, which can be irritating at times because you might be using an older phone, and some apps on your phone might not be supported in the latest iOS version, or you might not want to update your iPhone as yet.
But as mentioned earlier, this problem has straightforward solutions. This article will guide you on restoring your iPhone without updating it.
Table of Contents
How to Restore iPhone without Update
Using Recovery Mode
Recovery mode is one of the best ways to restore an iPhone without updating iOS.
Here’s how you will use the recovery mode.
1: Back Up Your Phone
All data on iPhone will be deleted during the restoration through the recovery mode process. So, for example, if you have some essential data that needs to be saved, you should back up that data. Usually, the data is automatically backed up according to the settings you have applied.
Still, you should back up your iPhone before beginning as recent data can be lost; iCloud backup or iTunes are two options.
2: Power the iPhone Off
Clench and hold the Power button on the right side or upper-right corner. If the iPhone supports Face ID, simultaneously clench and hold the Volume Down and Side buttons. To switch off the iPhone, slide the power symbol at the top.
3: Put the iPhone in Recovery Mode
Depending on your iPhone model, there are different ways to put your phone in recovery mode. Here are some of them:
iPhone 8 or Later Editions
On the right side, clench and hold the Side button. Attach iPhone to P.C. or Mac with a USB cable while clenching the side button. Continue clenching the side button until your iPhone displays the recovery mode on the screen. Close iTunes or Finder if it opens automatically.

iPhone 7 and 7 plus
Clench and hold the left-hand Volume Down button. Attach the iPhone to a P.C. or mac by clenching the Volume Down button with a USB cable. Clench the Volume Down button until your iPhone displays the recovery mode on screen.
iPhone 6s or Earlier Versions of iPhone
Clench down the Home button on the bottom of the screen. Attach your iPhone to P.C. or mac by clenching the Home button, and attach the iPhone to your P.C. or Mac with a USB charging cord. Clench the Home button down until the iPhone displays the Recovery Mode on the screen.
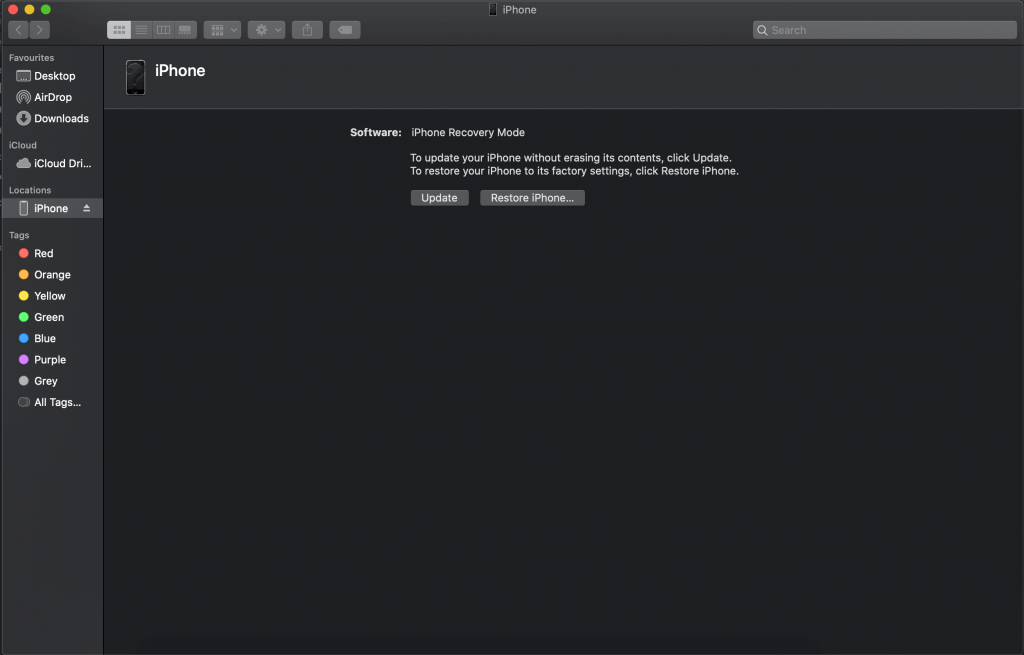
4: Open iTunes or Finder
Open iTunes on Windows P.C; it is represented by a white icon with two musical notes. Open Finder if you’re using a Mac with a newer version of macOS.
5: Select the iPhone Icon
In iTunes or Finder, it’s the iPhone-like icon in the upper-left corner. It’s right beside the top-right drop-down menu.
6: Click Restore
In the pop-up alert, it’s the first option. This will return the iPhone to its original factory settings. It will be exactly how it was when it was first purchased.
By doing so, restore iPhone without an iPhone software update to the latest iOS version.
Using iTunes Backup
Recognize that you’ll require a Previous iTunes Backup.
Using a prior iTunes backup, this procedure restores iPhone. You may need to utilize a different method if you don’t have a previous iTunes backup stored on the P.C.
Backup your iPhone
If you restore the iPhone to a previous backup, you may lose part of your current data. So, before you begin, make a backup of your iPhone. You could use iCloud or iTunes to do so.
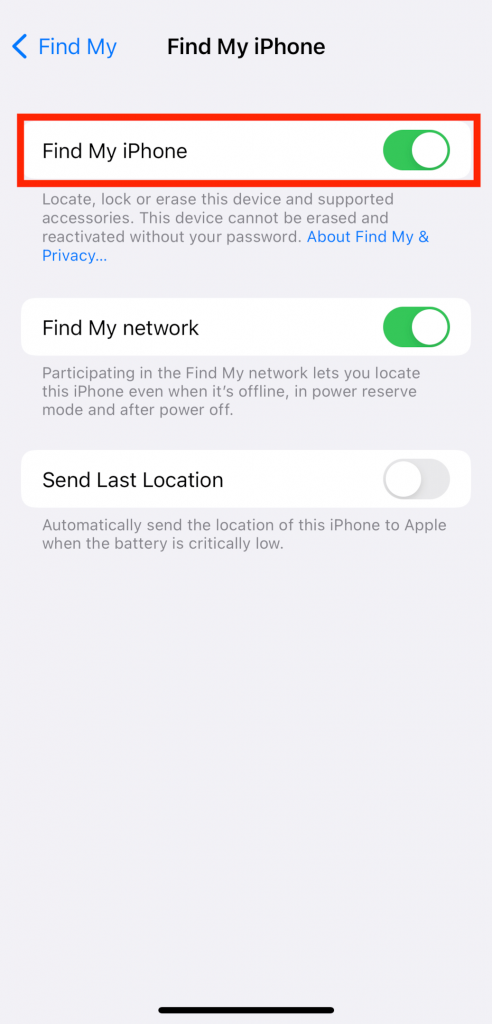
Turn off Find My iPhone.
It would be best if you disabled ‘Find My iPhone’ to recover your iPhone from a prior iTunes backup. To switch off Find My iPhone, follow these steps:
- Launch the Settings application
- At the top, tap Apple ID
- Type ‘Find My’
- On the top, select ‘Find My iPhone’
- Enter the password of Apple ID
- On the upper-right corner, tap Turn Off
Pair the iPhone with the P.C.
Attach the iPhone to a free USB slot on the P.C. with the charging cord that comes with it.
Open iTunes on Windows or Finder on an iOS Device
Use iTunes on Windows P.C. . It is represented by a white icon with two musical notes. Open Finder if you’re using an apple with a newer version of macOS.
Select the iPhone icon. The icon in the upper-left corner of iTunes or Finder looks like an iPhone. It’s just close to the top drop-down menu.
Select Restore Backup
It’s the second option in the “Backups” box, after “Manually Backup and Restore.”
Select the previous Backup you’d like to restore.
Click Restore after Entering Apple ID Password
This indicates that you wish to restore the iPhone to the Backup you chose. Allow a few minutes for the restoration to complete. Now you have finished restoring your iPhone without updating the software.
Using Factory Reset
- Back up the iPhone.
- Using factory reset will erase all the data from the iPhone. Before you begin, make a backup of your iPhone. You could use iCloud or iTunes to do so. After resetting the iPhone, you can restore it using iCloud or iTunes during the first setup process.
- Select the Settings Menu
- It has a symbol that looks like two gears. To access the Settings menu, tap the icon on your Home screen.
- Click General
- It’s right next to a gear-shaped icon. It can be found near the top of the Settings menu.
- Scroll Down and Click Transfer or Reset iPhone
- It’s the second-to-last choice on the menu at the bottom.
- Click Erase all content and settings
- It’s the last choice on the menu at the bottom.
- Click Continue
- This page shows you what information will be deleted from the iPhone. To continue, tap Continue at the bottom.
- In some iOS versions, a window pops up to choose between “Backup then Erase” and “Erase Now.” If you haven’t already, back up the iPhone before erasing it. Otherwise, continue by tapping ‘Erase Now’ twice.
- Enter the password or unlock code of Apple ID.
- This confirms that you wish to restore the iPhone to factory settings and reset it. It will take a few minutes to finish.
- After resetting the iPhone, you’ll need to go through the first setup process. Depending on whatever version of iOS you’re running, this may differ. First, you’ll need to choose your language and area, connect to the internet, and generate a passcode/FaceID.
- You’ll be given many alternatives to restore the iPhone when you go to the “Apps & Data” tab. Select Restore Backup if you have a backup stored in the iCloud. You could also choose to restore data from iTunes or transfer data from another device. Choose an option and follow the prompts.
- Select ‘Do Not Transfer Apps & Data’ at the bottom of the screen if you do not want to restore your iPhone. Then, later on, you could download your apps from the App Store.
- Sign In using the Apple ID
- After recovering the iPhone, you’ll need to check in with the Apple ID. To sign in, use the email address and password.
- You may be requested to accept the Terms & Conditions as well. If this is the case, hit Agree to proceed.
- The unlock code or password from another iPhone, iPad, or Mac may be required. If so, continue by entering the password.
- Complete the Initial setup
- Depending on the model of the iPhone, you may be asked to enable specific functionalities. To set up that feature, press Continue or tap Set up Later in Settings to continue. Restore iPhone without updating will be completed once the basic setup process ends.
Using Third-Party Apps
Third-party apps, for example, LockWiper, iMyFone, or FonePaw iOS System Recovery, could be used to recover the iPhone without updating it. However, there are no guarantees that these apps are safe and secure. So continue at your own risk, as you can damage the phone or data. We utilized the FonePaw iOS System Recovery program in this article as an example:
On Apple or P.C., load and set up the FonePaw iOS System Recovery program.
Open the program and select initiate > Try Free Quick Fix > Standard Mode from the menu.
Attach iPhone with the P.C. or Apple and enter recovery mode.
Click the Repair button after selecting the iOS version.
Press the Repair button. iPhone will now start with the selected operating system rather than the latest version.
Using Cydia, Used on Jailbroken iPhone and Locked iPhone
You must create a backup of critical information and all your important data.
On the device, launch Cydia. Open Source Software. It will show you all of the repositories where Cydia can discover packages.
To create a new repository, go to Edit and then Add.
When the input area appears, type in http://cydia.myrepospace.com/ilexinfo/.
Select Add Source. This will add the repository and save it.
In Cydia, look for “iLEX R.A.T.” Select iLEX R.A.T. from the drop-down menu.
Install it and start using it right from your home screen.
Tap Confirm after selecting iLEX Restore. The restoration process will begin without having to update the iOS version on the jailbroken or locked iPhone.
Conclusion
In this article, I have mentioned the number of methods to restore iPhones without an update. You can use whichever suits you.