

Ever since the Covid-19 pandemic, webcams have become a massive part of our lives. Working from home is a new normal for us, and so is the online meeting.
Your Mac camera plays a vital role in getting you through by the day. From Zoom meetings to Skype video calls with friends and family, life without a Mac camera seems impossible.
But imagine getting late for an online class because you find your camera not working. It sounds horrifying.
However, you do not need to worry, as we have solutions for every problem. Read the post to find out why is your Mac camera not working and what you can do to fix it.
Table of Contents
What are Common Mac Camera Problems?
You may be wishing your best friend a happy birthday on Skype, but the blurry image and poor video quality spoil the moment. Unfortunately, such annoying situations can often occur when using a Mac webcam.
However, in worst cases, you can find your Mac camera not working.
In addition, there is a possibility your Mac is not recognizing your Mac webcam. For instance, you want to use Photo Booth, but it tells you, “There is no connected camera.”
These situations can occur occasionally, but luckily, they always have solutions. You need to make some minor fixes, and you are good to go.
How to Fix Your Mac Camera Not Working?
You might wonder what caused your Mac camera not to work correctly? If everything looks OK, what can go wrong?
There are several reasons you may find your camera not working on Macbook.
Apart from general hardware issues, here are some easy steps you can follow to fix your Mac camera:
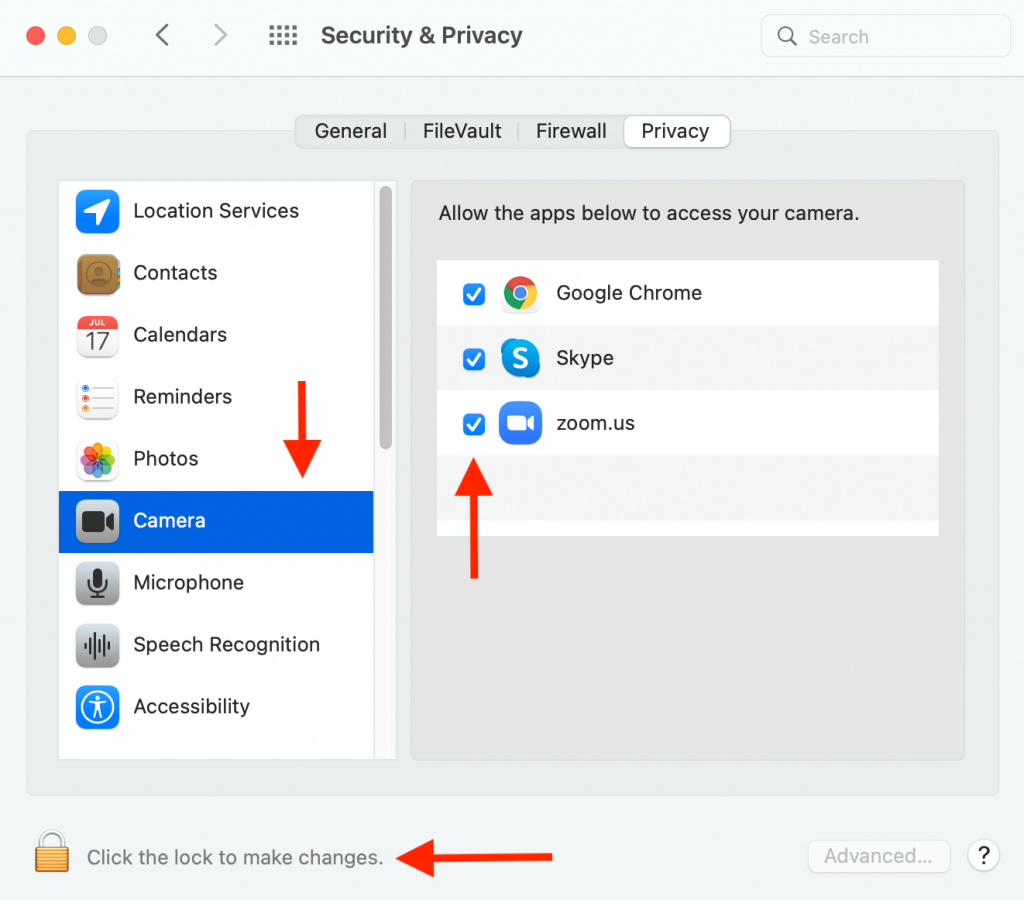
Allow Camera Access from System Preferences
Your Mac may block your camera access to third-party apps to protect your privacy.
Usually, you will receive an alert the first time you use an app to allow the camera.
But if you find your camera not working, there is no camera settings app from which you can turn it on. You need to allow access from the System preferences.
Here’s how you can do it:
- Navigate to the Apple menu.
- Select System Preferences.
- Open Security and Privacy.
- Click Privacy.
- Choose Camera from your sidebar.
- Then you may check the box present next to the app you want to use.
- You may need to use your administrator’s password to unlock the padlock at the bottom-left to make changes.
Restart Your App
If you are experiencing problems with a specific app, it is better that you restart it. This can be helpful with apps like Skype, Zoom, Photo Booth, FaceTime, or any app that uses your Mac’s built-in camera.
To restart your Mac, follow these steps:
- Press Cmd + Q. This will shut down the current app you are using.
- Another way to do this is, Go to any app
- Then, from the menu bar, select Quit.
- Once done, you can restart the app like usual.
However, if an app refuses to quit usually, you can press Option + Cmd + Esc.
This will allow you to force quit the window. Alternatively, you can also force-quit by selecting the app and pressing the Force Quit button.
Give Your Mac a Fresh Start
Restarting is an excellent way to solve several technical issues. It may remove many minor software glitches in the system while using an app.
Similarly, if you find your built-in camera not working on your Macbook, you can fix it by restarting your Mac computer.
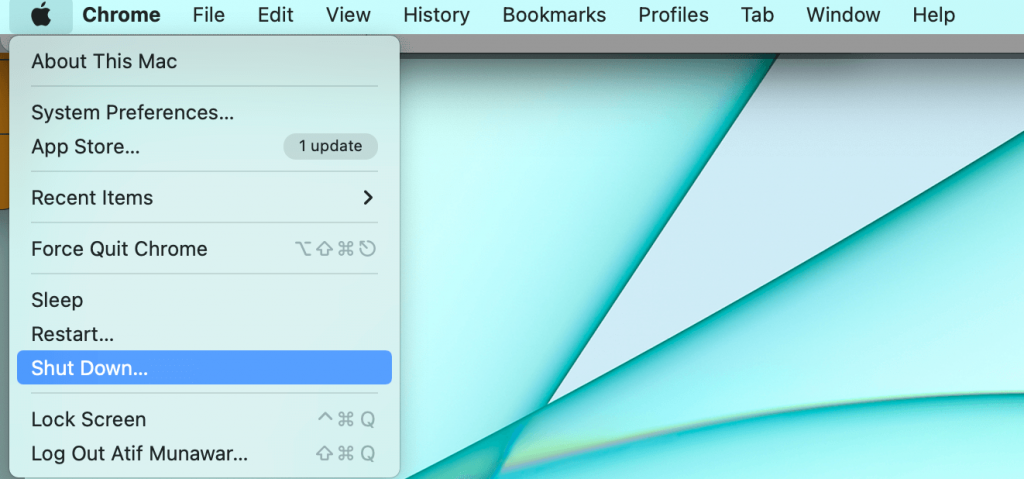
To restart Mac, all you need to do is:
- Go to the Apple menu.
- Select Shut Down your Mac.
- Now, you will receive a pop-up confirmation message.
- Select not to Reopen windows when logging back in.
- Then, you may confirm to Shut Down.
- Once done, you must wait for at least 30 secs to let your Mac computer finish the process.
- After that, you may press the Power button to restart your Mac.
Update macOS and Application Software
Your MacBook air camera may not be working due to software bugs.
These technical issues may be present in your macOS software or the app you want to use. The best way to fix this problem is to look for software updates for both.
To Update Your Mac
- Go to the Apple logo
- Open System Preferences
- Select Software Update
- If an update is present for MacOS, download and install it.

To Update Any App
- Go to App Store.
- Tap on Updates. You may find this in the sidebar.
- Then, look for app updates for the application you intend to use.
- If it is an app you installed from outside the App Store, you may check for the latest updates from the developer’s website.
Test Your MacBook Camera From a Different App
If you cannot use your Facetime camera, try using it with a different app such as a Skype camera or Photo Booth.
If you find your Photo Booth or Facetime HD camera working, the problem lies with the app you faced issues with.
To solve the problem, you may follow these steps:
- From the menu bar, go to the app.
- Then, open Preferences.
- Select MacBook camera from the drop-down list.
This will likely solve the matter. However, try uninstalling and then reinstalling that Mac app if it doesn’t.
- Firstly, back up any critical data you may want to keep.
- To uninstall, go to the Applications folder in Finder.
- Drag the app to Trash.
- Then, empty the Trash before you reinstall the app.
Test Your MacBook Camera From a Different User Account
You can try signing in with a different user account to see if your Mac’s built-in camera works. If it does, it is evident that the problem is with your MacBook account.
You may need to switch from your old account to a new one to fix this issue. However, you can conveniently transfer your data to the new account you create.
To create a new user account:
- Open System Preferences.
- Go to Users and Groups.
- Click the Add (+) button and create a new user account.
- Then, you may go to the Apple icon to sign out of your old account.
Check Your Wi-Fi Connection
Your Mac’s webcam needs a strong and reliable internet connection to work smoothly.
If the internet signals are low, you may have poor video calls. At worst, your Mac cameras can drop connection with the computer software.
In such situations, it is better to use a stable Wi-Fi connection. You may also try the following options as a quick fix:
- Reconnecting to Wi-Fi
- Rebooting your router
- Using an Ethernet connection are all standard options
Boot MacBook In Safe Mode
Safe mode is a specific mode on your MacBook that you can enable to fix a variety of issues.
It performs various maintenance activities and prevents background processes from initiating on startup. So, it can be helpful if your Mac camera is not working.
To booth your computer in Safe mode, follow these easy steps:
- Open the Apple menu.
- Select Shut Down to turn your MacBook off.
- Then, press the Power Button and immediately press the Shift button while your Mac starts up.
- Once done, Safe Boot should appear in the top-right of the menu bar from the user login screen.
Now, you can test your MacBook camera while staying in Safe mode. Then, if everything is okay, you can usually restart your Mac and use it.
Restart Background Processes Using Terminal
While using any computer, dozens of new software helpers run in the background. It would help if you had several of them to allow your Macbook’s built-in camera to function correctly.
If any background processes crash and stop working, you can use Terminal to restart them safely.
Here’s what you need to do:
- Go to Applications.
- Open the Utility folder.
- Then, select Terminal.
- With the Terminal window open, type relevant commands and enter them to execute.
You can do this using Finder, Spotlight, or Launchpad as well.
Run Apple Diagnostics
With macOS, Apple includes built-in diagnostics software. You can use this software to look for faults with your MacBook’s hardware to explain why the camera isn’t working or available.
For running Apple diagnostics:
- Open the Apple menu.
- Press Shut Down to turn off your Mac.
- Then press the Power button to restart your Mac and immediately press and keep holding the D key until you see a language selection screen.
- To finish the diagnostics on your Mac, follow the on-screen prompts.
If you encounter any error codes at the end, note them and contact Apple Support to schedule a repair.
Scan Your MacBook for Malware
If nothing works to fix your Mac camera, your computer could be infected with malware.
Malware can block your camera on purpose, but it can also happen as an unexpected consequence. However, it’s not something you want in any case.
You may look through the macOS Activity Monitor to discover if anything is draining your Mac’s RAM or processor. If there is something you don’t recognize, it could be malware. It’s a good idea to search up anything odd on Google to discover what it is.
Reinstall Your MacOS
Although it may be a drastic step, you can easily reinstall your Mac’s whole operating system without losing any personal data.
This method effectively resolves almost any software issue, including those that affect your camera.
However, we recommend backing up your Mac before you reinstall macOS. Then, if anything goes wrong during the process, your data will remain safe.
For reinstalling macOS, you can follow these instructions:
- First, go to the Apple menu.
- Shut Down your Mac.
- Once it finishes shutting down, press the Power button, and immediately press and keep holding Cmd + R to boot your Mac into Recovery mode.
- Choose Reinstall macOS from the macOS utility window that may appear and follow the on-screen steps.
It could take a few hours for the process to complete depending on your Internet connection.
Reset PRAM and SMC from the Apple Menu
Your MacBook’s PRAM and System Management Controller (SMC) hold information, including display brightness, fan speed, and sound output.
It’s possible that a problem with any of these files can cause issues with Mac’s built-in camera.
Fortunately, resetting them is pretty straightforward without compromising any data. Follow these steps:
- Open the Apple menu.
- Press Shut Down to turn off Mac.
- Once shut down completely, press the Power button to restart your Mac and immediately hold Option + Cmd + P + R while the computer boots up.
- Keep holding these keys until an Apple logo appears on-screen for the second time.
The steps to reset your Mac’s System Controller may vary depending on different Mac models.
Final Thoughts
Mac cameras and Mac webcams are vital to us, and we can’t afford any issues with them.
However, you can try these troubleshooting methods to fix the “There is no connected camera’ error. We believe your problems can be fixed by at least one of these steps.
In contrast, if still nothing works out for you, you can head over to your nearest Apple Store. The Apple professionals can diagnose your problem and get it fixed for you in no time.