

Apple is currently the proud seller of the famous Mac. According to statistics for the year 2022, it was reported that around 100 million people use a Mac computer. The Mac gained popularity for its powerful operating system, retina display, and user-friendliness. Customers usually buy the following devices:
- MacBook Pro
- MacBook Air
- iMac
However, even powerful gadgets can run into system errors and bugs. For example, one of the main issues Apple users experience is the ‘screenshot on Mac not working.’
Table of Contents
What Is A Screenshot?
A screenshot is a picture of the user’s Mac screen, i.e., the desktop as it is or selected areas of it. It is similar to the ‘Print Screen capture’ on a Windows computer. It is a helpful feature that lets users snap important information on their screens.
In short, the screenshot option is a very resourceful tool for gadgets. It can crunch digital media storage and provide users with informative illustrations to further use as they see fit. The best part is that taking screenshots on Mac is super easy.
Screenshot on Mac
Taking a screenshot on Mac is very simple. It does not require a complicated screenshot app, and a keyboard shortcut works excellently. Here is how you can capture screenshots on a Mac:
Take a Screenshot of the Entire Screen
- To take a full-screen screenshot of a section of the screen, click Command + Shift + 3
- The camera shutter sound should alert you that a screenshot has been taken, followed by a small capture of the screen appearing on the bottom right side.
- You can open that screen capture to save or fix the screenshot before saving it.
Take a Screenshot of a Section of the Screen
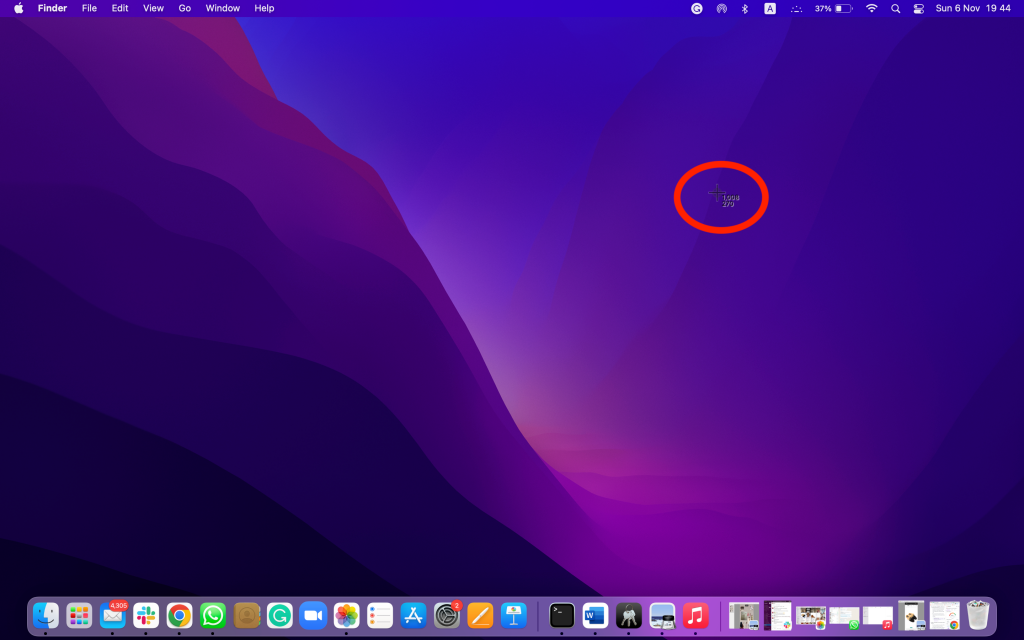
- To take a screenshot of a section of the screen, click Command + Shift + 4
- A toggle icon that looks like a plus sign will appear, and you can use your trackpad or mouse to select the area of the screen you wish to capture
- The capture will appear on the bottom right of your screen, and you can click to open a screenshot, edit the image or save it
Screenshot Apple Menu or Whole Window
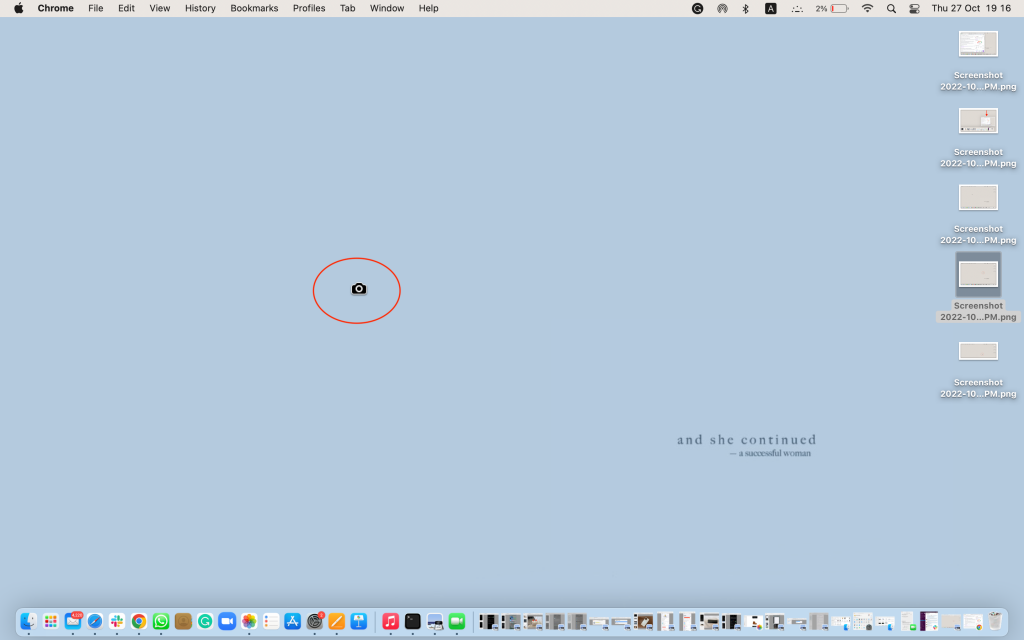
- To screenshot an Apple menu or window, keep your cursor on the item you wish to screenshot and click Command + Shift + 4 + Space.
- A small camera icon will appear, which you can hover over the drop-down menu or window to capture
- Click the icon using your mouse or trackpad, and your capture will appear on the bottom right of the screen. Here you can further edit the screenshot or save it as it is.
Simple and easy. Note that if your Sounds and Haptics are turned on, you can hear the camera shutter sound as your device takes the screenshot on Mac. You can turn this feature on or off using System Preferences.
Saving Screenshots on Mac
You can save screenshots or create a separate folder at a default location. By default, the screenshot is saved on Mac’s desktop. However, you can drag it to any folder you wish to save.
However, if you wish to change the location, here is what you can do:
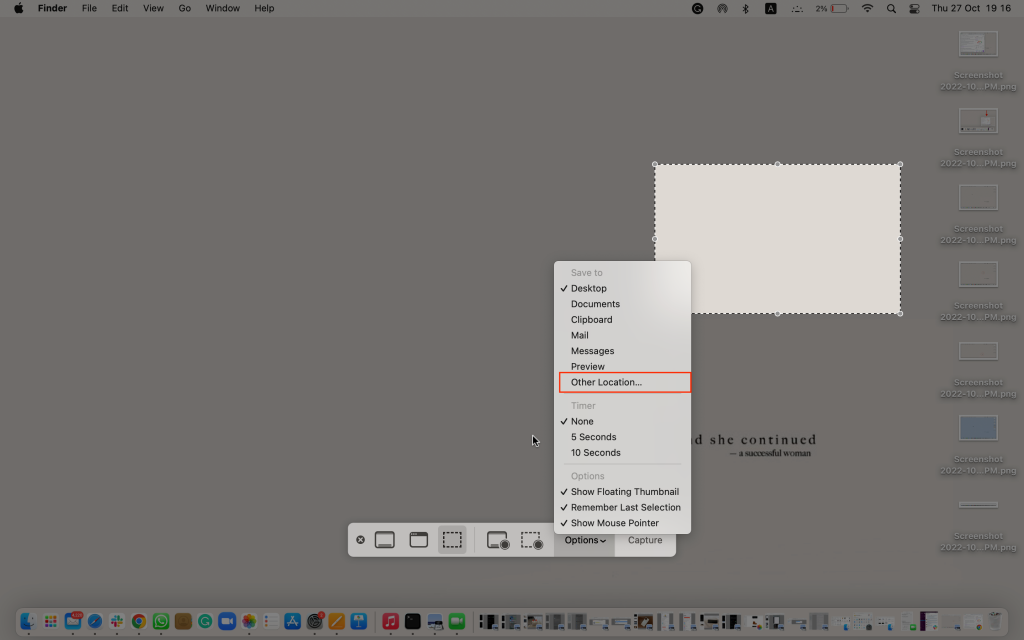
- Click Shift + Command + 5 to open the screenshot menu
- At the bottom, there will be a tab labeled “Options”
- After you click on “Options,” a pop-up menu will appear where you can click “Other Location” to set the new screenshot saving location.
Very simple and easy. However, what happens when the screenshot option glitches or doesn’t work?
Screenshot On Mac Not Working and 7 Quick Solutions
The Mac is a fantastic experience; however, as with all gadgets and technology, it is prone to glitches and errors. Many users have run into this mac issue and have Googled various ways for a simple fix.
The most common problem with screenshots is the screenshot app not taking the screenshots and not saving and recovering the screen capture.
So what are your options when your Mac screenshot isn’t working correctly?
- Reboot Your MAC OSOne of the most straightforward solutions to fix screenshots not working or if you are having trouble is to restart Mac devices. You can do that by clicking on the Apple logo on the top left corner of your screen and clicking “Restart” from the drop-down menu. Alternatively, you can hold the power button on your keyboard for a few seconds until your system shuts down. However, there is a chance that you may not be able to recover the lost screenshots.
- Close Extra Tabs, Windows, and AppsExtra tabs, Windows, and apps can pressure your Mac OS. It can slow down your device performance and cause hiccups in simple operations. Close any extra windows and apps not currently used to free up RAM space. Mac devices come with a great processor; however, it is prone to slowing down when overloaded with activity. Closing extra things can fix screenshot tool issues. What also helps is to organize your desktop to keep important information at the forefront.
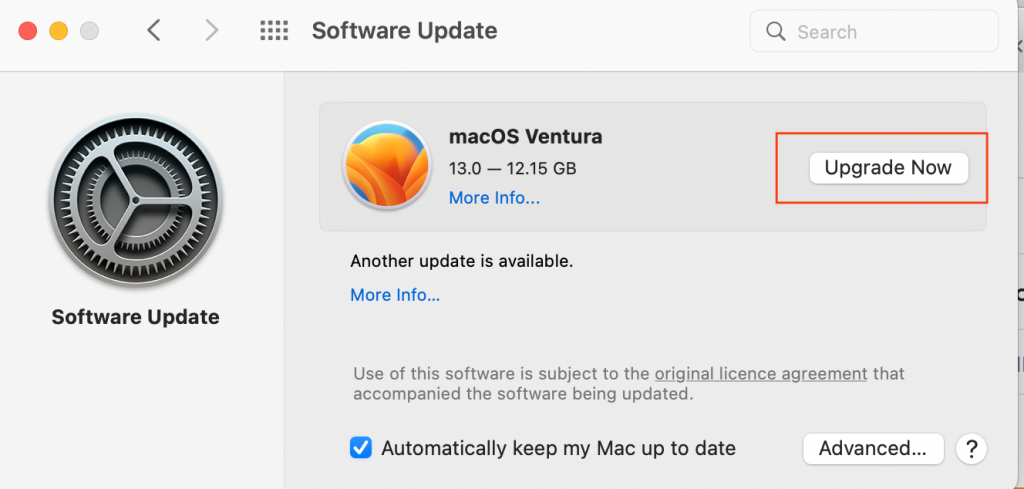
- Check for the Software UpdateApple frequently releases software updates that address glitches and bugs. In addition, the system usually notifies users about those updates. If you are having trouble taking a screenshot on Mac or your screenshot shortcuts are not responding, using screenshot tools, or saving the screenshots, chances are your OS needs to be updated.
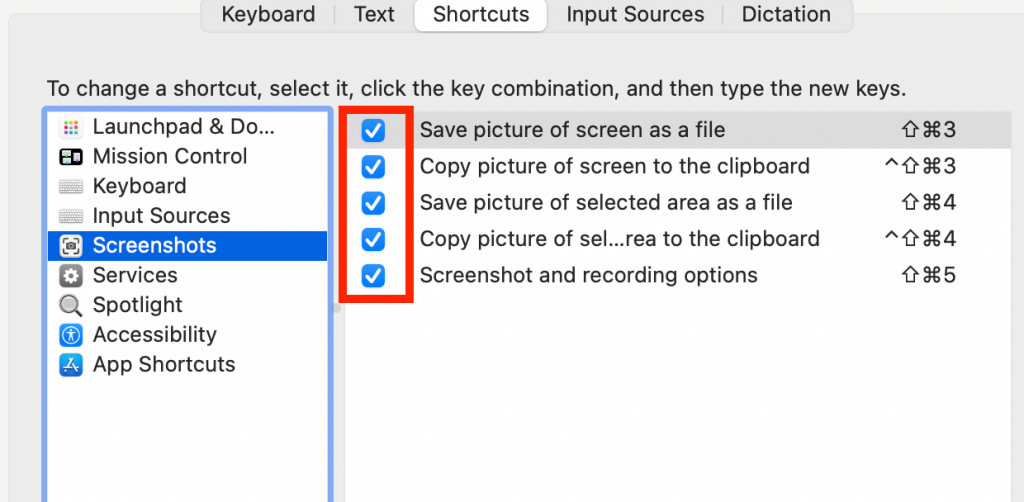
- Review Mac Screenshot ShortcutsHave a look at the screenshot keyboard shortcuts settings on your Mac. To do that, use the following steps:
- Click the Apple icon at the top left of your Mac’s desktop and choose system preferences.
- From the menu, click on “Keyboard,” and a tab will open up
- Click on “Shortcuts” on the menu bar and select “Screenshots”
- On the right tab, your options will appear, and you can tick them to enable keyboard shortcut settings
- Alternatively, if your keyboard shortcuts were disabled, you can follow the same steps to re-enable them
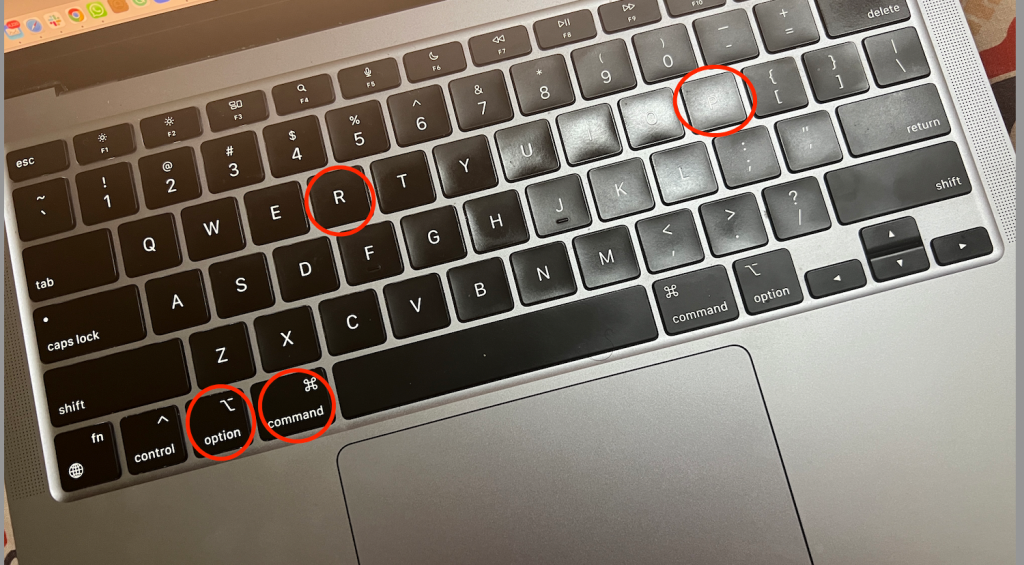
- Reset NVRAM on your MacResetting the NVRAM on your Mac can address the screenshot tool issues. In addition, the NVRAM is a vital part of your internal settings that tracks and manages operations like volume, screen resolution, and sounds, which help your Mac run smoothly. Reset NVRAM for Mac screenshots by following the steps below:
- Shut down your Mac by holding the power button or going to the top left of your screen and clicking the Apple icon
- Once your system has shut down, click the restart button, i.e., the power key on the top right of your keyboard, to restart your Mac.
- As you hear the startup sound, press the following keys for 20 seconds: Command + Option + P + R. Let your system boot up, and try taking a screenshot using screenshot shortcuts to check if the issue has been resolved.
- Clean System JunkSometimes, Mac settings can glitch when a lot of junk is stored. This can also create problems when trying to take Mac screenshots. Examples of system junk are:
- Cache files
- Improperly installed updates or apps
- Unused login items
- User logs
- Images on diskGetting rid of your junk by deleting and clearing them from your Mac device can improve OS efficiency and prevent the screenshot tool from misfiring. In addition, your screenshot on Mac may work better after you clear junk.
- Use Preview Tool to Screenshot on MacIf your screenshot tool is not working correctly; you can use the Preview application to take a screenshot. Here’s how you can do that:
- Open Preview from the from the Dock
- Go to the toolbar on the top of the screen and select “File” to open the drop-down menu
- Click “Take Screenshot” to reveal further options allowing you to capture the entire screen, a window, or a selected portion of it.

Screenshot on Mac Not Working and Recover Lost Screenshots
‘Screenshot on Mac not working’ can be stressful, especially if you have important images that are not saved. However, there are some quick ways to recover your stuff when your Mac screenshot is not working or any other issues, like misplaced shortcuts, arise.
Here’s how you can recover screenshots from your Mac:
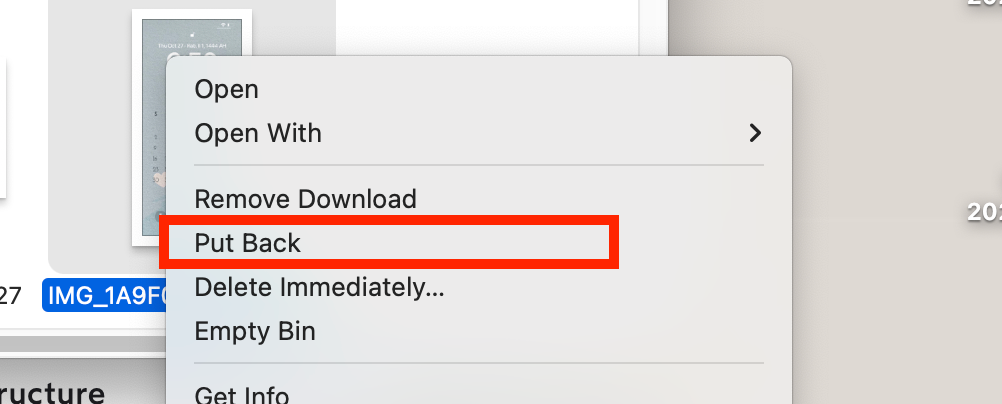
Recover the Lost Screenshots from Trash
You can recover the screenshot on Mac by doing the following steps:
- Open “Trash” and right-click on the screenshot you want to recover
- Select “Put Back” from the menu that opens up, and your mac screenshot will be recovered
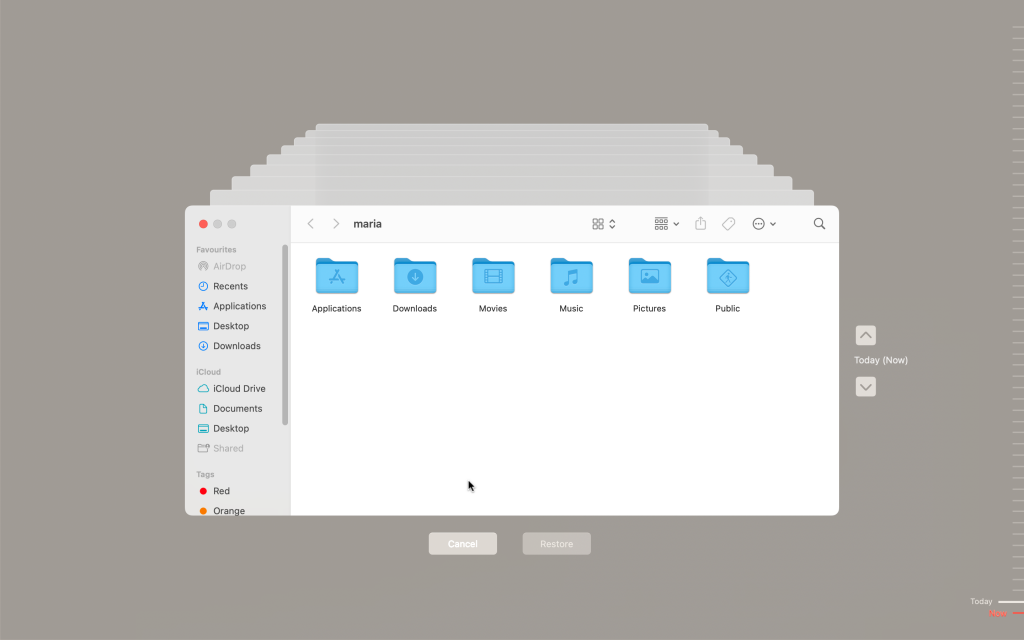
Use Time Machine
You can use Time Machine to keep a backup of your Mac. This allows you to retain all work in case of misfires or glitches. After you connect to Time Machine, perform the following steps:
- Go to “Finder” and access the folder which saves your screenshots
- Open Time Machine by clicking its icon
- The application opens up the backup, which allows you to select the screenshot you want to save
- Click on the desired screenshot and select “Restore”
Use Dropbox
You can use Dropbox to store your screenshots. You can set it up using Preferences and the following steps:
- On the Desktop app, click “App Preferences”
- Next, click on the “Back Up” tab
- Now you can tick the option titled “Share Screenshots and Screen recordings Using Dropbox”
Conclusion
In conclusion, the Mac screenshot feature is essential to the overall experience. It is user-friendly, quick, and has incredible Mac screenshot shortcuts and captures high-quality images that improve the work you want to do.
Screenshots on Mac not working should not be a problem anymore with the handy tips we have offered you. However, if you have trouble with your screenshot shortcut, disable and enable screenshot preferences and navigate to the screenshot tab; this article should dissipate your worries.