
Imagine you’re suddenly enveloped by darkness. Your brain rings a bell, prompting you to use your phone camera’s flash. However, you only see a grey flashlight icon that won’t toggle on. You panic. It’s quite a picture. I wouldn’t want to be stuck with your flashlight not working, right?
Switching on the torch feature on an iPhone or iPad is the simplest of all tasks. All you need to know is how to swipe up and locate the Flashlight option from your device’s control center. However, many users have reported several iPhone problems, including the flashlight icon greyed out.
This error is especially noted in newer Apple inc. iOS versions like iOS 13, iOS 12, iOS 11, or the new iOS 15.
So, before you find yourself in a murky situation, we’ll give you the solution to fix flashlight problems, such as a greyed icon.
This tutorial may help with other Apple inc. Devices such as the iPod and iPad as well.
Table of Contents
Why is the Flashlight Option Greyed Out?
Sometimes when you’re faced with the iPhone flashlight greyed-out error, it indicates that the camera app is open. Other times, it could mean other software on your iPhone is accessing the camera app, so it’s running in the background. For example, Instagram, Snapchat, Instagram, and the Messages app usually have access to your camera.
There are many ways to fix the flashlight greyed issue. An easy fix is to force close all your phone apps. However, at other times the issue might be in your device, such as software problems. If the glitch persists, drastic steps, such as using the device’s standard repair or restore mode.
Quick-Fix iPhone Flashlight Greyed Icon
First of all, don’t worry, as this is a regular when it comes to iPhone problems. Secondly, you can fix your Apple devices with the following tips and tricks:
Shut Down the Camera App
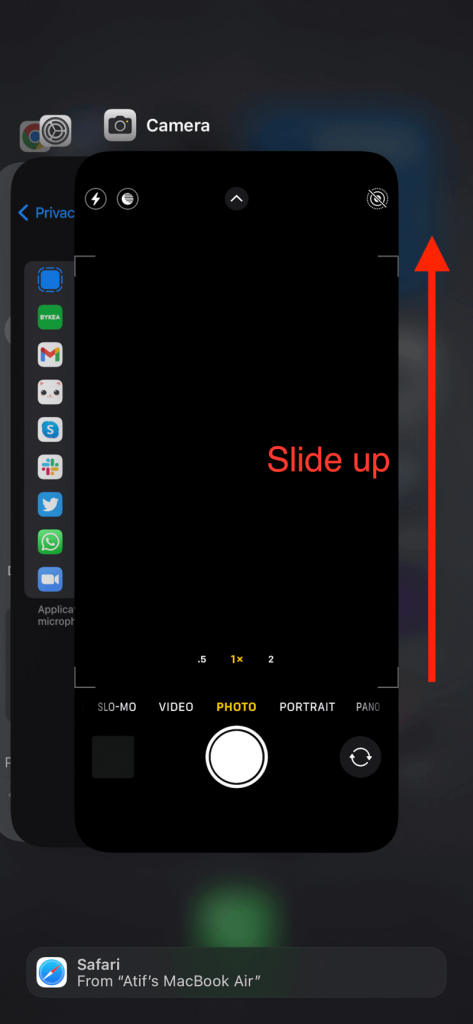
The most common reason why the greyed-out switch of the iPhone flashlight appears is the camera app running in the background. This is not a severe problem, as closing the app takes care of the problem.
How you close apps depend on your iPhone model. So, to fix iPhone devices with Face ID:
- Tap the home screen. Then, swipe up till you see all your open apps appear as a slider.
- This is the Apps Launcher. Find the app on it that you want to shut down.
- Swiping up closes the apps.
If you have an iPhone 8, SE (first generation), or earlier, follow these steps:
- First, double-tap the Home button to open your most recently operated apps.
- Find the application that you want to close on the screen.
- Swipe up to close it.
Close All Apps
There may be several programs running on your iPhone that may be accessing your camera in the background. Consequently, this could be a reason why the flashlight is not working error appears.
You can use the above steps to close apps individually via the App Launcher furthermore if you want to close all the apps simultaneously.
Ensure Your iPhone is Charged
An uncharged battery can also result in persisting the iPhone flashlight’s greyed-out issue. This is because it enters low power mode, which prevents the flashlight icon from being tapped.
Phone flashlights occupy a chunk of your device’s battery life. All you need to do is put your phone on charge for a little while and then try again. If the issue is not fixed, try the following troubleshooting tips.
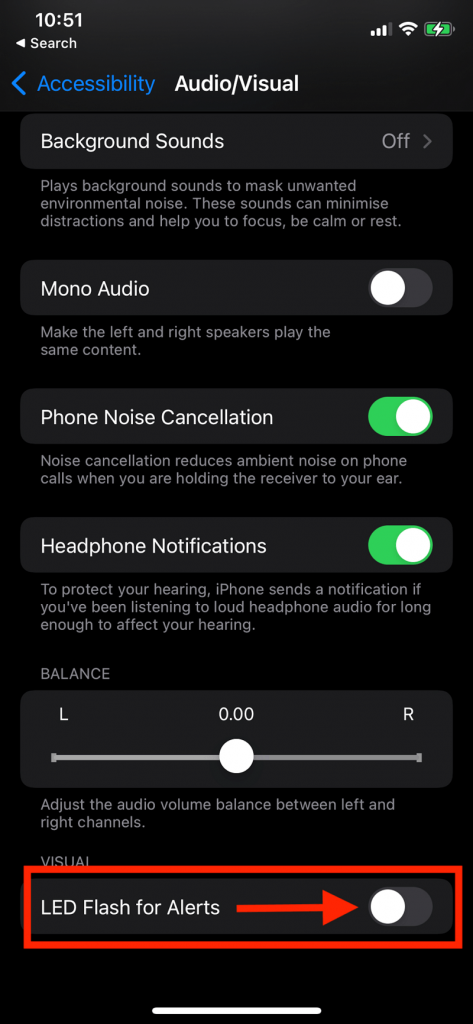
Switch Off LED Flash for Alerts
Many iPhone users have reported that turning off LED flash notifications can fix the iPhone flashlight greyed.
- Open the iPhone Settings app, and look for the Accessibility option.
- Select Audio/Visual
- Scroll down until you locate LED Flash for alerts
- Switch the feature off
Force-Reboot iPhone
Your flashlight may be greyed out due to minor operational issues in your device. This could be due to various reasons, like your handset misinterpreting the camera’s opening. This is easily fixable if you forcefully restart your iPhone.
Depending on the model of your device, the process to restart your iPhone differs.
For Face ID devices, iPhone 8, or the iPhone SE (second gen), you can use your volume buttons:
- First, press the side button, which turns up the volume, and hold on to it.
- Then, press ‘n hold the lower volume button simultaneously until the cute and famous Apple logo pops up.
If you have iPhone 7 or 7 Plus:
- First, press’ n hold the Power and Volume Down buttons.
- Then, lift your finger when the logo screen emerges.
Follow the steps if you have iPhone 6S, SE (first gen), or earlier models:
- First, press’ n hold the Home and Power buttons simultaneously till the logo appears.
After performing these steps for your respective model, your device will restart. If your flashlight is not working and the situation is still not resolved, head on to the next step.
Solution 6: Update the iOS
It is essential to keep your iPhone iOS up to date. An outdated iOS can cause frequent errors in your iPhone, such as the flashlight not working.
You can download the most recent software for your iPhone in several ways.
But the easiest way is:
- Launch the iPhone’s settings app.
- Find General, and then tap on Software Update.
- Tap Install Now if you see the option to download.
Updating on a computer:
You can also download the latest version of iOS through iTunes on your computer.
After connecting your phone to your computer, launch iTunes. Next, tap on the Devices tab, and select the update option under the summary. This will download and install the firmware file.
Pursue Recovery Mode
Software issues could be the reason why your phone’s flash is disabled. If the force-reboot option does not work, you may have to enter recovery mode.
This is a more specific option to fix the issue at hand.
But before we go ahead, here is a crucial warning: backup your data. If a software problem is identified during recovery mode, it could alter or delete your data. iCloud or iTunes backups are a simple way to protect your pictures and videos.
Once you’re done with data backup, follow the steps ahead for a system repair:
- Open iTunes
- Link your iPhone to your computer through the USB cable.
- Shut down any program you are running on your iPhone, as they could cause problems during system repair.
- Now, the following steps depending on which iPhone’s flashlight is causing problems:
iPhones with Face ID, iPhone 8, and the iPhone SE (2nd gen):
- Press and hold both your phone’s volume toggles at the same time.
- Then, hold the power button until the system repair or recovery screen appears.
iPhone 7 or 7 Plus:
- Hold up and down buttons simultaneously, releasing once you see the standard repair option.
iPhone 6S, SE (2nd gen), or earlier releases:
- Hold the side button for power and the home button simultaneously.
- Let go when you are prompted to restore your iPhone and follow the on-screen instructions.
If it takes longer than 15 minutes, your iPhone will exit the standard repair mode. Then, your device should restart automatically, and hopefully, the iPhone flashlight greyed-out issue has been fixed.
Take Help From Recovery Software
Recovery mode is risky as all personal data can be erased quickly. If you want to avoid this, use recovery software to fix flash instead.
These platforms review your phone and remove complicated software problems without affecting personal data.
The problem with this fix is that recovery software usually isn’t free. So, you will have to invest in it.
The Bottom Line
A greyed-out flashlight icon can be annoying on iPhone. But the good thing is that it’s not difficult to fix. For the most part, the Control Center greys the flashlight button when your camera runs in the background. Closing the processing app instantly takes care of the iPhone problem if this is the case.
If none of the solutions fix your flashlight icon issue, visit your nearest Apple inc. Store or consult one of their experts online.