
Since its inception nearly a decade ago, AirDrop has proven it is an essential addition to Apple’s operating system. Users can transmit any file between Mac Desktop, Mac Mini, Macbook Pro, Macbook Air, and iOS devices such as an iPhone or iPad.
With Mac’s AirDrop, anyone can wirelessly transfer files, images, or videos between two Apple devices, like Mac to iPhone. Furthermore, you can exchange files with friends and family if they own an Apple gadget and are within your Mac’s range. This article highlights how to turn on AirDrop and transfer files from Mac to iPhone or vice-versa.
Table of Contents
What Is AirDrop and How Does it Work?
Usually, when you want to send files like images to others, you email or text them across. But, experts recommend that owners choose AirDrop on a Mac for transferring files to other Apple devices.
The AirDrop protocol enables iOS and Mac devices to share files simultaneously. It works by using Wi-Fi and Bluetooth to establish a peer-to-peer connection with the recipient’s device.
You don’t require internet connectivity for Airdrop. However, it would help if you were connected to the same WiFi network and had Bluetooth turned on from System Preferences for AirDrop to work.
Is AirDrop Safer than Emails?
When your Mac connects with nearby devices to AirDrop files, the link is protected by each device’s firewall. As a result, outgoing and incoming file transfers are encrypted before sending. This makes AirDropping significantly safer than sending files over the internet via email.
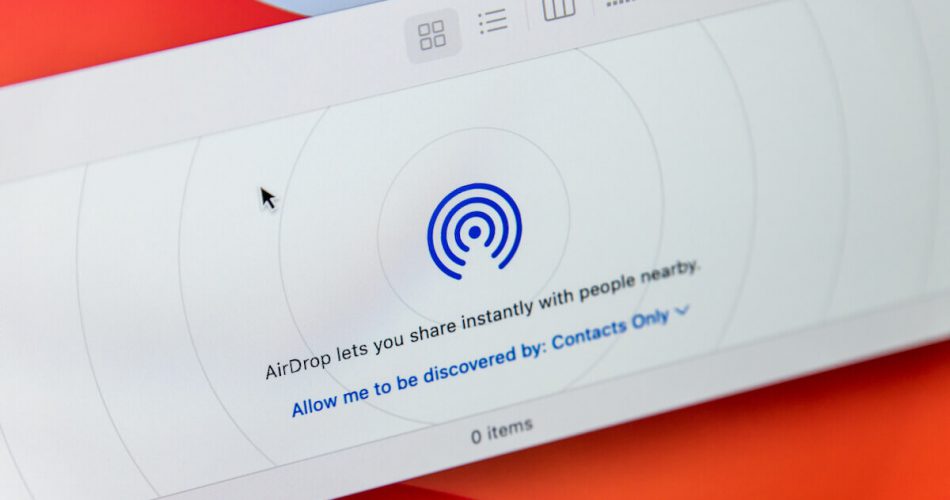
Moreover, you have ultimate control over your privacy. AirDrop settings allow users to choose from whom they accept file transfers. You can limit this to your contacts list for the highest level of security.
Additionally, you also have the option of completely blocking out AirDrop transfers. But doing so would render your Mac invisible to any other device looking to transfer files.
What Size and Type of Files can you AirDrop?
There is no limit on what you can send via AirDrop from Mac devices. In addition, AirDrop isn’t exclusively for transferring images to preserve their HD quality. Instead, you can send webpages, bookmarks, notes, playlists, contacts, music files, and more, thanks to AirDrop! Furthermore, the function can handle pinned information, such as locations, in the Apple Maps app.
Most pre-installed iOS programs rely on AirDrop to share files, such as Safari and Contacts List apps. Some third-party applications are compatible, but it’s up to the app’s creators.
The best part is that AirDrop doesn’t have file size restrictions. So even though it takes a little bit longer to duplicate larger files, the average time is typically less than a minute.
Devices That Support AirDrop
AirDrop is exclusive to Apple devices like Macs, iPhones, and iPads. So before you try to send files, it’s crucial to check whether your device is compatible with AirDrop.
The only system requirement aside from compatibility is that the sender and recipient must be near each other, ideally within 30 feet.
Mac Compatibility:
You can easily Airdrop on a Mac computer released after 2012 running on OS X Yosemite or later. To check if your Mac supports AirDrop, open Finder by clicking its icon in the Dock Menu bar. Your Mac is incompatible if you do not see or cannot select AirDrop.
iOS Device Compatibility:
You’ll need an iPhone 5 or a later device model to utilize AirDrop. Additionally, the function is available on iPad 4, iPad Mini, and 5th generation iPod Touch or newer devices.
How to Turn On AirDrop on your Mac Step-by-Step
You need to turn on AirDrop on all your devices to get started. The process is very similar for macOS and iOS.
You can select AirDrop on a Mac in three ways: from the Finder window, Control Center, or directly within the file you want to send. But first, toggle Bluetooth on from the Mac settings app or Control Center.
Turn On AirDrop Through Mac’s Finder:
Using Airdrop from the Finder window allows users to share multiple files in one go swiftly.
- Open the Finder window from your Mac Dock. Then from the menu bar, select Go. Tap AirDrop.
- The AirDrop Finder Window will open up. You can adjust your incoming connections’ discoverability from here and set it as you desire.
- Wait for a few seconds for available nearby devices to appear. If the iOS device you are looking for doesn’t show up, repeat the steps above.
- If you still face errors, select the “Don’t See What You’re Looking For” option. The on-screen prompts will help you locate and AirDrop files to older Macs.
- To immediately share the selected apps, drag them into the AirDrop window.
This is the most straightforward way to turn on AirDrop and transfer files from your Mac to your iPhone whenever you need them. Add the AirDrop icon to your Favorites list to make things even simpler.
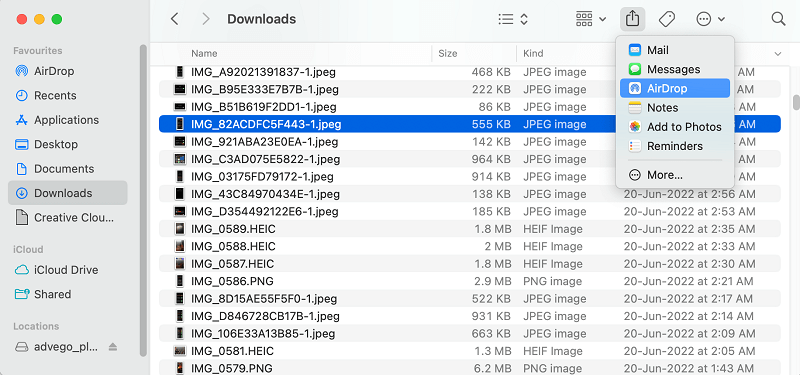
You can also use the Finder Window to locate the file you want to AirDrop instead. Then:
- Select the file you want to AirDrop. Next, click the share icon in the top right corner of your Finder Window. The icon features an arrow pointing upward.
- Tap AirDrop from the drop-down menu. Then, double-click the iPad or iPhone recipient on the list that appears.
Directly AirDrop from within Mac Apps:
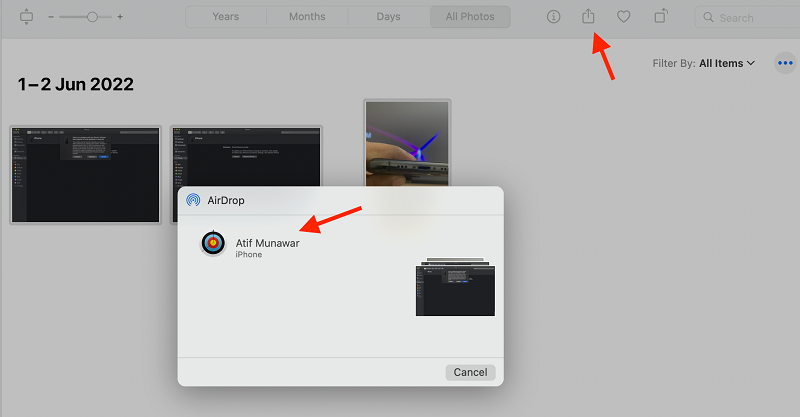
Mac users can quickly transfer files like images and videos straight from the Photos app. For example, to send files straight from the Photos app:
- Open the Photos App on your Mac and select all the files you want to transfer.
- Locate the Share icon, just like you would in your Finder Window. Then, repeat the steps above to share.
Similarly, you can transfer files directly from Microsoft Office Suite Apps like Word or Excel and Adobe Acrobat Reader. For example, to share a Word Document or PDF:
- Open the app on which you are editing or viewing your document. Then, click the Share button at the top right of your screen.
- From the popup menu, tap “Send a Copy.” Then, locate the Share icon once again to select AirDrop.
Activate AirDrop from Mac’s Control Center
You can find AirDrop in the Control Center on macOS Big Sur and newer. First, look for the logo from the top Menu Bar, which looks like two buttons. Then, from within the drop-down menu, toggle the Airdrop icon.
Turn On AirDrop on iPod, iPhone, or iPad
To use AirDrop to send files to and from Mac, you must activate the feature on your other device. Enabling AirDrop from iPhone or iPad settings is more straightforward than on a Mac and only asks for a few steps:
- Swipe down on the upper-right corner of your iPhone, iPad, or iPod to open its Control Center. You can find WiFi, Bluetooth, and other settings here.
- Select Airdrop to activate it.
Finally, to AirDrop a file to your Mac, select the files from the application you want to share, like the Photos or Camera app. Then, locate the Share button to AirDrop the files to your Mac.
Understanding How to Receive Files from Apple Devices
When someone tries transferring files to your Apple device, you will receive a notification to Accept AirDrop files and a preview. After that, it’s up to you to either accept files or decline the transfer.
This way, you can stop your device from accepting AirDrop files from strangers without permission. But did you know you can modify your AirDrop block settings even further?
AirDrop Settings
There are three AirDrop options on every Apple Device: Contacts Only, Everyone, or Receiving Off.
If you check AirDrop to Contacts Only, no one other than the devices on your contacts list can see your device. On the other hand, Receiving Off disables AirDrop, so you can no longer receive files. Finally, turning Everyone on makes your Mac visible to all devices on the same Wi-Fi within range.
Find your AirDropped Files
It’s one thing to choose AirDrop to receive files, but where do they go once you Accept the download? Files that are AirDropped are automatically saved to the Downloads folder on your Mac. This adds up since an AirDrop is technically a download, only the delivery is more direct.
Photos sent from your Mac to iPhone or iPad devices will automatically appear in their Photos app when received. Likewise, any webpage will open on your iOS device’s default browser, and PDFs will open in the Files app. In addition, the iPad or iPhone accepting Airdrop files will detect which program to use.
You can save your files directly and prevent missing backups using cloud storage like iCloud with your Apple ID or Google Drive.
4 Reasons Why AirDrop Won’t Work on Mac
Watch a few things if you have issues with AirDrop on a Mac. These include:
Wi-Fi and Bluetooth are Not Working
To transfer files, AirDrop uses Bluetooth and Wi-Fi. So you shouldn’t face problems unless you use public Wi-Fi or something that prevents your connection, like a VPN.
Also, ensure you activate both devices’ Bluetooth. You can access connectivity settings from the Apple icon in the top menu of your Mac. Then, select System Preferences to enable.
Outdated or Sleeping Mac
While AirDrop works with older Macs, it is not as efficient. This may be questionable if you have older iOS or Mac devices that don’t feature AirDrop or are running an old version of macOS.
Incorrect Apple Device Settings
iPhones, iPods, and iPads have the same three options as AirDrop from Mac. AirDrop Settings set to “Contacts Only” will prevent new devices from discovering your Mac.
Personal Hotspot or AirPlane Mode Activated
AirDrop doesn’t work using your iPhone as a Personal Hotspot. Similarly, if your iPhone or iPad is set to AirPlane mode, it can’t connect to Wi-Fi or Bluetooth.
Turning off these features are the only way to activate file transfer. But, of course, you can always turn your Hotspot or AirPlane mode back on after you Airdrop from Mac.
To Sum it Up
While iCloud continues to become more reliable, syncing across several devices can consume a lot of time. In addition, it’s impossible to overstate AirDrop’s ability to transfer and receive files. Moving files instantly seems like magic, but AirDrop makes it possible.
AirDrop is used globally by people who own an iPhone and Mac as support. So as long as you set it up correctly, it would help if you didn’t risk missing or duplicating files.