

Macs use a Domain Name System to open websites on the internet. A DNS works as a ‘GPS’ to open IP addresses of different sites. Every website on the internet is linked to an IP address which is its location. But it is often difficult to memorize IP addresses as they are in numeric values.
This is where the DNS server chips in. It gives a domain name to every IP address and makes it easier for us to remember it. For example, the domain name ‘FaceBook.com‘ IP address is 69.63. 176.13. Every internet service provider provides its DNS servers, which can later be changed.
Your computer uses DNS to access websites. It is like a directory of all the websites in the World. The servers are invisible to users, but if they slow down or stop working, it causes internet disruption.
Table of Contents
How do DNS servers work
A DNS server is a directory for an IP address and domain name. Whenever you enter a domain name in your search bar, your computer will send that to a DNS server. The server then finds the IP address associated with that domain name and opens it.
One can easily change DNS servers on their Mac or Windows PC. Below are the steps to change your Mac’s DNS address and servers.
Change your DNS server Settings on Mac
To change your DNS server on your Mac, follow these steps:
- Click the Apple menu and select ‘system preferences’ or,
- Use the ‘system preferences’ icon in the dock to launch it
- Tap on ‘Network’ and select the ‘Network interface’ from the side menu (if not selected by default)
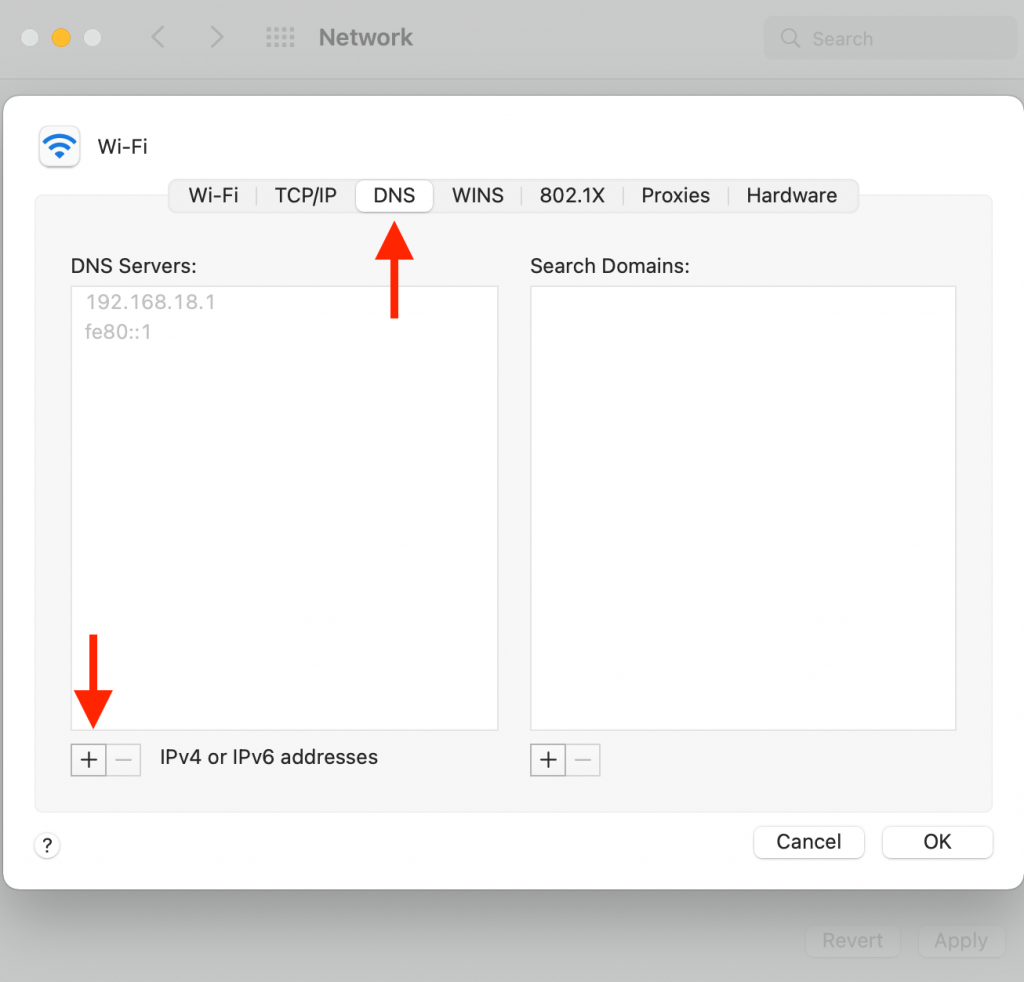
- Click ‘Advanced’ in the lower corner of the ‘Network window’, then click the ‘DNS’ tab. It will show all the current DNS addresses
- Then click the ‘+’ button to add new DNS servers
- Enter the public DNS server numbers and tap ‘OK’
- Click ‘Apply’, and your new DNS address will start running
You can use any of the following DNS server addresses for new servers:
- 1.1.1.1= Cloudflare’s DNS
- 8.8.8.8= Google’s DNS
- 84.200.69.80 or 84.200.70.40 = DNS. Watch etc
Change your DNS settings on Windows
To change your DNS settings on your Windows computer, follow these steps:
- Click ‘Network status’ from the start menu and click ‘Change Adapter settings’
- Right-click on the Wi-Fi network and select ‘Properties’
- Go to the properties of ‘internet protocol version 4’ and click on ‘Use the following DNS server addresses
- Add the new DNS server numbers in the DNS tab to get a different DNS address on Windows
Selecting DNS servers
If you use the DNS servers of your internet service provider, it can easily track your activities and site visits on the internet. But, changing your DNS server will make it harder for the internet service provider to track your profile.
Many companies offer free DNS servers for users. Mentioned below are a few ways you can change the DNS server settings to a new one:
- Cloudflare DNS
The safest option is Cloudflare DNS. It is reliable and won’t keep your data. You can use the following DNS servers numbers to use Cloudfare
- 1.1.1.1
- 1.0.0.1
- 2606:4700:4700::1111
- 2606:4700:4700::1001
- Google DNS
Google’s DNS servers never redirect the users or filter/block the searches. Hence, it is the best choice for filter-free internet browsing.
Use the following DNS servers numbers to use Google
- 8.8.8.8
- 8.8.4.4
- 2001:4860:4860::8888
- 2001:4860:4860::8844
- Google Public DNS
Google Public DNS is another DNS server you can use free of cost. It also provides the users additional services like parental controls and malware protection. It is an excellent alternative to Mac’s DNS servers.
Use the following DNS server numbers to use Google Public
- 8.8.8.8
- 8.8.4.4
- 2001:4860:4860::8888
- 2001:4860:4860::8844
- Verisign Public DNS
Verisign Public is another company that provides a stable and secure DNS server. It does not give the users’ data to third parties or show ads.
Use the following numbers for Verisign Public:
- 64.6.64.6
- 64.6.65.6
FAQs
What DNS Should I use on Mac?
You can use the OpenDNS for your Mac as it is known to be the fastest and most reliable DNS, plus it’s free.
How do I change my DNS to 8.8 8.8 on Mac?
You can change DNS on Mac by following the steps mentioned above in the article. If you find this article helpful, then try the steps to change your DNS.
Where are my DNS settings, Mac?
The following steps can find your DNS:
- Apple menu> system preferences> Network> Advanced> DNS. In the preference pane, you will see the list of DNS servers.
What should be my DNS settings?
Using default DNS settings or some reliable third-party DNS servers is preferred.
Conclusion
Changing your Mac’s DNS servers can be for various reasons, including privacy, reliability, etc. They are usually faster and more reliable than the ISP’s servers. So, would you prefer to have the default DNS settings or change them to improve your Apple devices’ performance?