
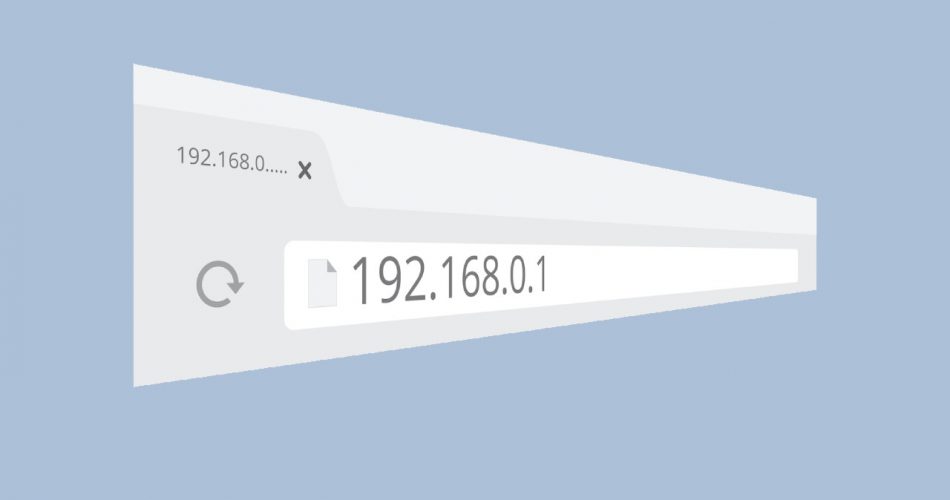
At times macOS users face the self-assigned IP address malfunction on their computer. Your Mac will keep alerting you to the ‘internet not working’ pop-up even if you have a Wi-Fi network connection.
It allows the network interface to make a malfunctioning ad-hoc network. There can be many reasons for network issues like a broken cable, DHCP server problem, network location, etc. But, it gets better if you know the correct way to troubleshoot the issue.
Table of Contents
Fixes for the self-assigned IP address issue
Self-assigned IP issues can frustrate users and cause internet issues. But, fret not, you can fix self-assigned IP address malfunction using any of the methods mentioned below:
- Restart your modem
Before trying any other method to fix the internet issue restart your modem to see if it works. Click the ‘Wi-Fi’ button from the top menu on the Mac to turn it off. Please wait for a few minutes and then turn it back on. Check to see if the issue is fixed.
If this hack works, you will see the Wi-Fi connection running on your Mac with a proper IP address.
- Re-enable the network preferences
To reset network preferences on your computer, follow these steps:
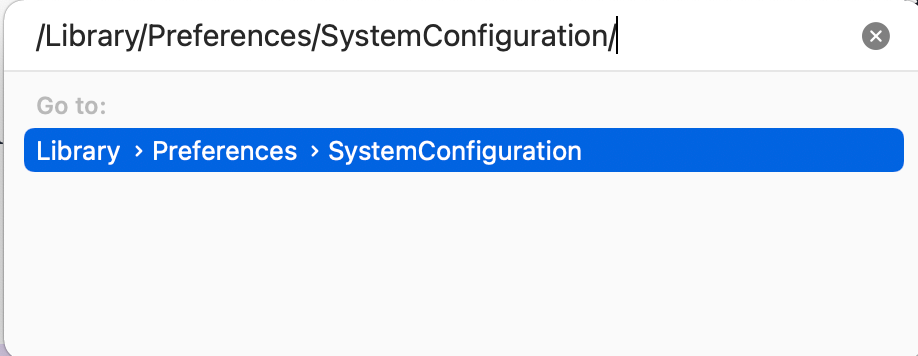
- Open Mac, launch ‘Finder,’ and in the top menu bar, tap on ‘Go to Folder’ from the drop-down menu of the ‘Go’ bar
- A new window will appear, type
''/Library/Preferences/SystemConfiguration/''and press enter - The System Configuration window will open. Then delete the following commands: ‘com.apple.airport.preferences.plist, Networkinterface.plist and preferences.plist’ to reset network configurations
- Please only delete the files if you have no issue losing the network configuration
- Please switch off the Mac and then switch it back on; try and link to the Wi-Fi again
- Open TCP/IP settings again and look for the files that you deleted
- You will find the removed files back in the old folder

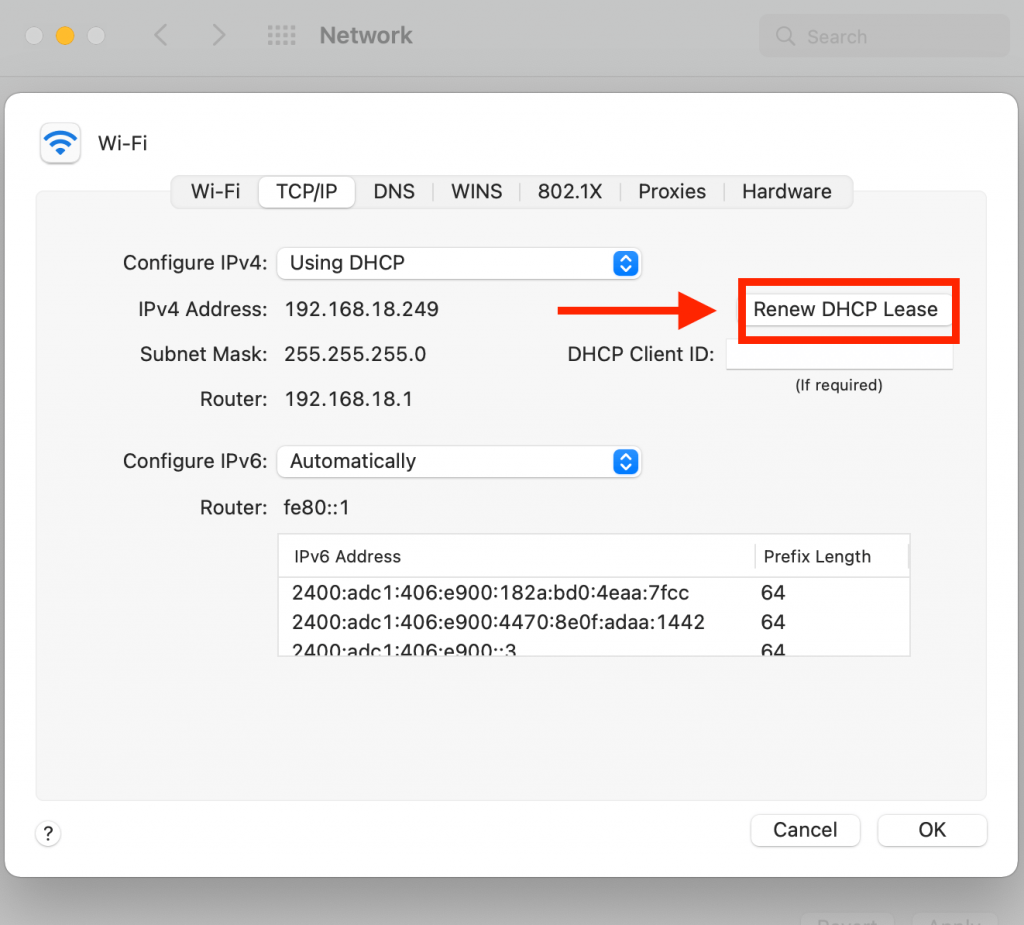
- Renew DHCP lease
One of the most common fixes to the ‘self-assigned IP issue’ is to renew the DHCP lease. A DHCP lease temporarily assigns an IP address to a device connected to the internet.
If the internet connection is malfunctioning, follow these steps to renew your DHCP lease:
- Tap the Apple logo on the top-left menu bar, then visit the ‘System preferences’ section
- Then click on ‘Network settings’ and click ‘Advanced’ in the Wi-Fi section
- Then select the ‘TCP/IP’ section and tap on the ‘Renew DHCP lease’ button and select OK
- After renewing the lease, check if you can connect to your Wi-Fi
- Make a different network location/ new location
One way to fix self-assigned IP is to set up new network locations on your Mac. Follow the steps below to make a new network location:
- Tap on the Apple logo from the menu bar and select ‘System preferences’
- Enter the ‘Network settings’ then tap on ‘Drop-down menu’ near the Location tab
- Then tap on ‘Edit locations’ and tap on the ‘+’ button and add a ‘new network location’ and tap on done
- Choose ‘Wi-Fi’ or Ethernet; if not selected automatically
- Then press on ‘Advanced’ button and again press the ‘Renew DHCP lease button’ and enter
- This will set a ‘new location’ on the device
- Reset Firewall
Primarily self-assigned IP address malfunction occurs when the system’s Firewall undergoes configuration problems. If you have performed significant configuration changes on a Mac, settings may not migrate properly. It causes a Firewall issue and might disrupt the network connection.
To fix the firewall configuration issue, follow these steps:
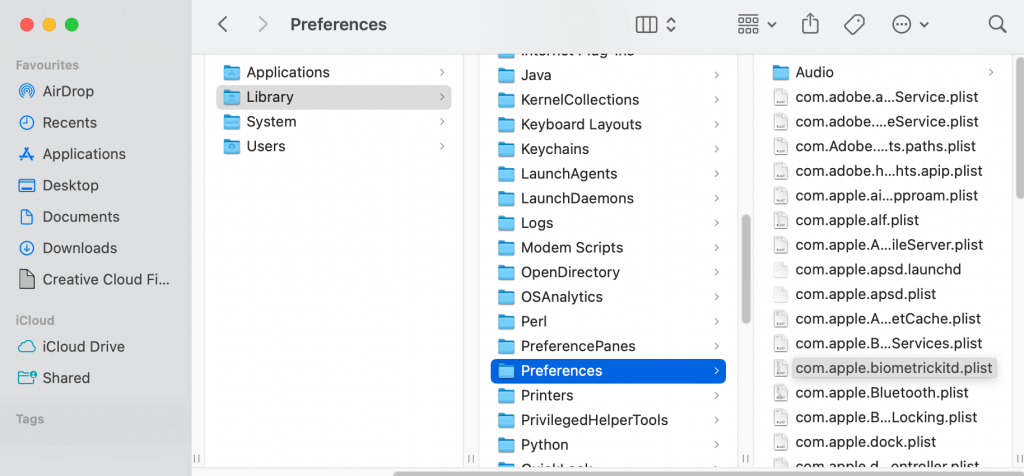
- Click the ‘Finder’ icon to launch it, then select ‘Go to folder’ in the ‘Go’ menu bar
- In the pop-up window, enter the following command
/Macintosh HD/Library/Preferences/ - In the new window, delete the ‘com.apple.alf.plist’ command
- After the Mac restarts, reboot it and check if the Wi-Fi connects
Note that after the system boots, you would have to allow connections for the numerous programs temporarily.
- Setup the service order in network settings
If your Mac has a self-assigned IP address issue, try resetting the service order of Wi-Fi in the network settings.
To set ‘Service order’ on Mac, follow these steps:
- Select the Apple logo on the screen and click ‘system preferences’
- Click on ‘Network icon and then press on the gear icon
- Then tap ‘Set service order,’ and drag the services you are using at the start of the file
- For example, if you are utilizing Wi-Fi, select ‘Wi-Fi’ and put it on the first number

- Change DNS servers
DNS servers change the domain name to IP addresses. Try changing the DNS servers to see if the issue fixes. Follow these steps:
- Select the Apple logo and click ‘system preferences,’ then click on the ‘Network’ icon
- Select the Wi-Fi icon or Ethernet you use (if not selected already)
- Then choose the ‘DNS’ tab in the ‘Advanced’ section and press ‘+.’
- Add the following numbers to the DNS server list: ‘8.8.8.8, 8.8.4.4, 1.1.1.1, 9.9.9.9’ and click ‘OK’
- It will most likely fix the self-assigned IP address problem in your Mac

Contact an Apple support team tech. If the above methods do not fix your Mac’s self-assigned IP address issue.
FAQs
What does self-assigned IP mean on Mac?
Self-assigned IP is one of the reasons why you are unable to use the internet on your device. It mainly occurs when your network router does not provide your device’s IP address, causing internet connection issues.
How do I give my Mac a static IP address?
You can give your Mac a static IP by following the steps below:
- Select the Apple logo and click ‘System preferences’
- Click on the ‘Network’ tab and then select the ‘Advanced button’
- ON TCP/IP section, open the configure IPv4 list and select ‘manually’
- Enter your IP settings in the field, and the static IP address will the assigned
Conclusion
By now, you must have learned how to fix self-assigned IP on your computer. Though it is not a huge problem, it does cause a lot of frustration among users. Hopefully, you found the article helpful and learned how to fix network malfunctions on your mac OS.